ACENTAUR1.2 Manual 1.2.0
Contents

ACENTAUR 1.2 Manual

1.2.0

01 · QUICK START

Quick Start

ACENTAUR is a plug-in in your DAW that turns a description, a captured passage or both into audio you can drag straight into the arrangement. This section gets you from installation to the first result; the sections after it explain each Mode, TAX™, ACENTAUR Net, the hosts and Settings.

What ACENTAUR does

ACENTAUR is a generative musical instrument and a reimagined sampler. It can create audio from a musical description, work with audio from your session, add parts, reshape passages, build a Track Stack, and analyze audio.

ACENTAUR produces audio, not MIDI. It creates candidates for musical decisions; it is not a stem separator or a finished-song generator.

Everything runs on your Mac. Generation does not need an internet connection once the Models are installed. A second Mac can take the work over if you set up ACENTAUR Net.

What’s new in 1.2

ACENTAUR 1.2 rearranges the surface, adds a Mode and makes the status line more honest. If you know 1.1, this is what to look for. Every item is described in full in its own topic.

Extract
A new Mode that takes one instrument out of a Capture or a Generation and plays it on its own — vocals, drums, bass or any other part you pick. It is not stem separation: the Model performs the part again instead of cutting it out. Auto runs the Model’s own extraction; Custom lets you describe the part and draw a selection. See Extract.
One panel, two pages
SETTINGS and ADVANCED share one panel at the bottom left. Each text field carries its name as a tab on its top edge, and Open TAX, ENHANCE PROMPT and GENERATE stand together at the bottom right. The Modes run in a new order: Text to Music, Add Layer, Track Stack, Cover / Remix, Edit, Retake, Extract, Audio Analysis. See The surface at a glance.
HP FILTER
A zero-phase high-pass on every take, set on the ADVANCED page: 20, 40 or 60 Hz at 6, 12 or 18 dB per octave. Vocals and guitars sit cleaner in a mix at 60 / 12; bass and drums stay unfiltered. See Controls that apply everywhere.
USE CAPTURE
Beside CLEAR at the reference slot: the Capture you are working with goes to the Model as the reference. In Cover / Remix it is on from the start. It replaces SOURCE AS REF.
USE AS CAPTURE
Replaces the KEEP CAPTURE switch of 1.1. The Capture is always the input; this button makes the Generation you are looking at a Capture of its own when you want to build on it.
Playback
The menu lists your Captures first and your Generations below them. The arrows on either side step back and forth through the Generations. Takes without a prompt are named after their Mode: Add Layer 1, Cover 2, Extract 3.
Bars
The Duration (bars) slider moves in single bars up to 32 and in larger steps beyond, so short loops are quick to set and long pieces are still in reach.
Analyze Audio
Can be cancelled, shows that it is working even right after a take, and finishes in a fraction of the time. Audio Analysis has two switches, ANALYZE MUSIC and ANALYZE LYRICS.
Key and language
The key ACENTAUR hears from a Capture stands in the waveform header, CAPTURE | 9.12s | 120 BPM | A MINOR, and goes into the Key menu in grey italics as a suggestion. A language heard from the lyrics is shown the same way. A value you choose yourself is never touched.
Status line
When GENERATE rests, the line always says why. A take that comes back silent is a grey sentence with what to try next, not a red engine error. While a Model loads, the line names it as the menu does: Loading ACE XL Turbo ….
Settings
The license card has Deactivate this Mac …, so you can free a seat yourself. The Danger Zone lists its actions as rows with a description each.
Fixed
  • The playhead no longer flickers while ACENTAUR is bypassed; it disappears and comes back at the right place.
  • No button changes its size with its state.
  • The edges of the surface line up in every host, including LUNA.
  • Every take leaves ACENTAUR without the small DC offset the Model used to put on it.
  • Option-click on a Track Stack track takes the prompt and lyrics you were looking at along to that track.
  • AGAIN in Audio Analysis only appears for the source that was analysed; a new source asks for ANALYZE.

Projects saved with 1.2 need 1.2: ACENTAUR 1.1 opens them without the plug-in’s settings. Update every Mac that shares your projects, including a render Mac for ACENTAUR Net.

Requirements

  • ACENTAUR installed and activated on the Mac that runs it.
  • A host that loads Audio Unit v2 or VST3 plug-ins on Apple silicon.
  • At least one installed Model that supports the Mode you want to use.
  • Enough free storage for Models, Captures, and generated audio.

ACENTAUR runs in any host that implements Audio Unit v2 or VST3 to the specification. It is tested and officially supported in Logic Pro 12, Ableton Live 12 and Universal Audio LUNA 2.

ACENTAUR installs both formats. Which one your host uses is the host’s decision, not a setting in ACENTAUR — see Host notes. ACENTAUR Net requires a separate activation and the required Models on the render Mac. Projects saved with ACENTAUR 1.2 need 1.2 on every Mac that opens them; 1.1 opens them without the plug-in’s settings.

The surface at a glance

One surface, the same in every host. It is always dark, and you can resize it by dragging the lower right corner; every new instance opens at its normal size.

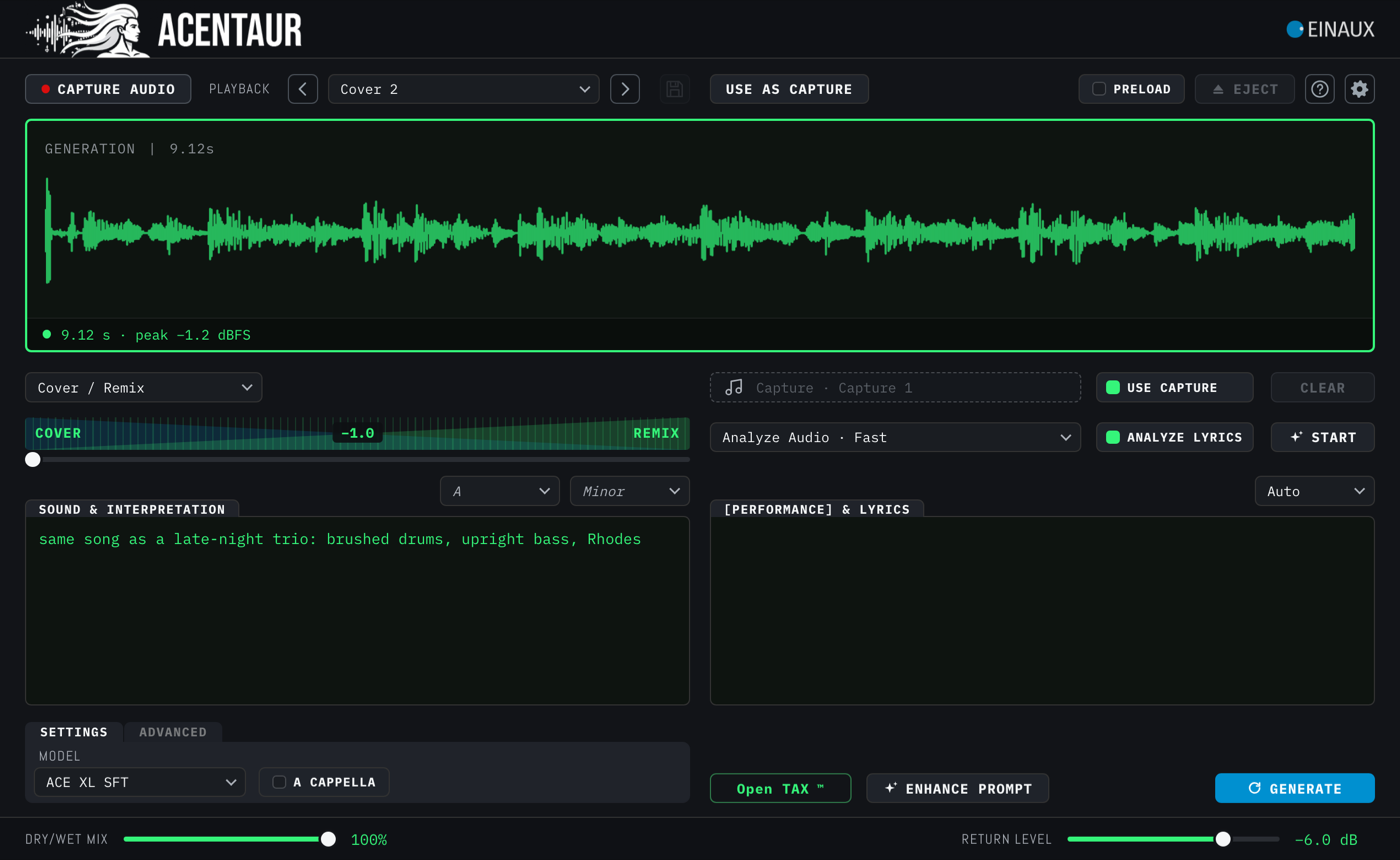
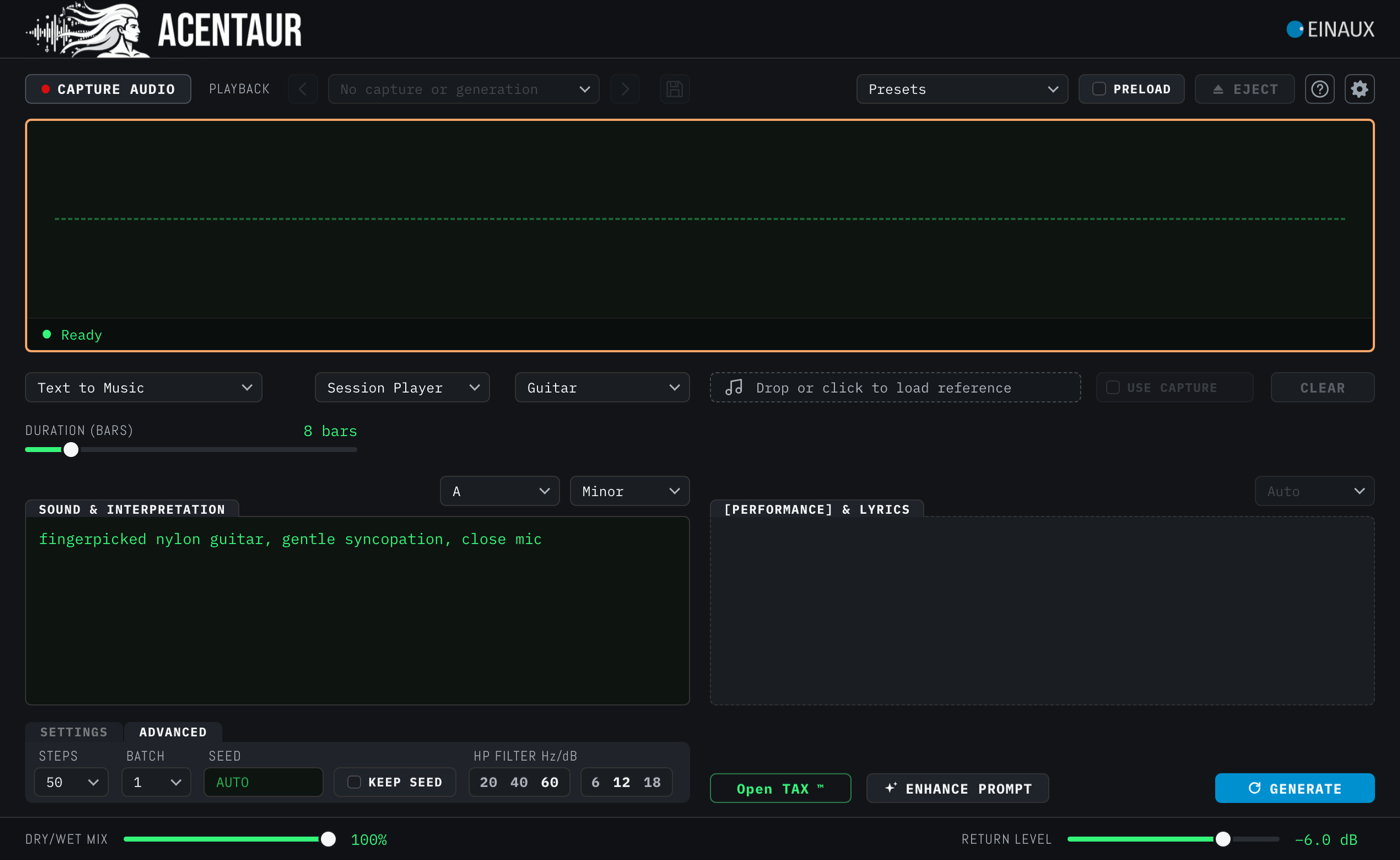
The whole ACENTAUR surface with a finished Generation in the waveform, the Cover / Remix controls, the two text fields and the SETTINGS panel
The surface with a finished Generation: utility row, waveform with the status line, the controls of the Mode, the two text fields, the settings panel with the triggers.
Top row
The ACENTAUR word mark on the left, EINAUX on the right. Nothing to operate.
Utility row
CAPTURE AUDIO on the left — neutral with a red dot when idle, filled red while armed or recording. Next to it the Playback menu: your Captures first, in the order they were made, each with its length and the number of Generations made from it; below them the Generations; last Rename Current Capture…. The arrows on either side of the menu step to the previous and the next Generation. Then the disk symbol for Save Location, and in Cover / Remix, Add Layer, Edit and Extract the button USE AS CAPTURE. On the right Presets, PRELOAD, EJECT, and the symbols for Help and Settings.
Waveform
Shows what ACENTAUR is working on. Its header names the kind of audio and the full length, for example GENERATION | 10.24s. For a Capture it adds the tempo it was made at and the key ACENTAUR hears: CAPTURE | 9.12s | 120 BPM | A MINOR. A key with a question mark, A MINOR ?, is not clear enough to be used; drums, noise and near silence get no key at all. While a selection exists its length follows. SNAP and the drag field sit on the right. Empty, the waveform shows a centre line and says nothing.
Status line
The one place where ACENTAUR speaks. Grey asks you for something, orange means it is working, red is an error or a missing prerequisite, green is a finished result.
Mode row
The Mode menu on the left with the controls of the Mode beside it: a type, a Layer, a Duration (bars) slider, the Cover lane. The right half has three columns: the reference slot, USE CAPTURE and CLEAR in the first row; the Analyze Audio menu, ANALYZE LYRICS and START in the second, wherever a Mode can analyse.
Text fields
SOUND & INTERPRETATION and [PERFORMANCE] & LYRICS. The name of each field is a tab on its top edge; Key, Major/Minor and Language stand in the row above, on the right. In Flow the tabs SOURCE and TARGET sit next to the name.
Panel
Bottom left, as wide as the left text field, with two pages. SETTINGS holds the Model and the few switches that belong to the Mode: INSTRUMENTAL, ENHANCE TIMING, A CAPPELLA, Flow Base; in Retake it shows Pinned instead of a Model. ADVANCED holds Steps, Batch, Seed, KEEP SEED and HP FILTER. Which page is open is not saved.
Triggers
Bottom right: Open TAX, ENHANCE PROMPT, ACENTAUR NET whenever a render Mac is there, and GENERATE at the right edge. Generate carries an open arc arrow; START and ENHANCE PROMPT carry a spark. Only Generate is coloured.
Footer
Dry/Wet mix and Return level: what leaves ACENTAUR.

What the display shows is what the tools act on. If a control is greyed out, the status line says why.

Open ACENTAUR

Open ACENTAUR on a track or bus and choose a Mode. The menu runs in the order you reach for them: Text to Music, Add Layer, Track Stack, Cover / Remix, Edit, Retake, Extract, Audio Analysis. In Logic Pro, source-free work such as Text to Music or Track Stack with Empty Stack is best placed as an AU MIDI-controlled effect on a Software Instrument track.

Each Mode below states what it does, what it is good for, what it needs, and what to keep in mind. GENERATE at the bottom right starts every Mode; it carries an open arc arrow. START in the right half and ENHANCE PROMPT carry a spark: they also send work to the Model, but they write text, not audio.

Holding the Option key while choosing a different Mode carries the current prompt and lyrics into the new Mode. It does not matter whether Option is held before clicking the menu or only while choosing.

The text fields keep their own undo history: Cmd+Z and Shift+Cmd+Z work inside SOUND & INTERPRETATION, [PERFORMANCE] & LYRICS and the TAX lyrics draft without reaching the DAW.

INPUT, REFERENCE, GENERATION, OUTPUT

INPUT
The audio ACENTAUR works on. It can be captured, loaded, or supplied by a supported DAW drag. Some Modes need none.
REFERENCE
A separate audio guide for supported Modes. Load it from Finder or a supported DAW drag. It steers the process without becoming INPUT.
GENERATION
One audio result created by ACENTAUR. Audition it, return it to the DAW, or reuse its WAV as a new INPUT.
OUTPUT
What ACENTAUR returns to the DAW. Dry/Wet mix balances source and Generation; Return level sets the output level.

INPUT and REFERENCE are two different source contracts. DAW-specific ways to supply them are listed under Host notes.

02 · MODES

Choose the Mode that matches the musical task

Text to Music

Text to Music has two types. The type decides what kind of result you get, so choose it before anything else.

Session Player
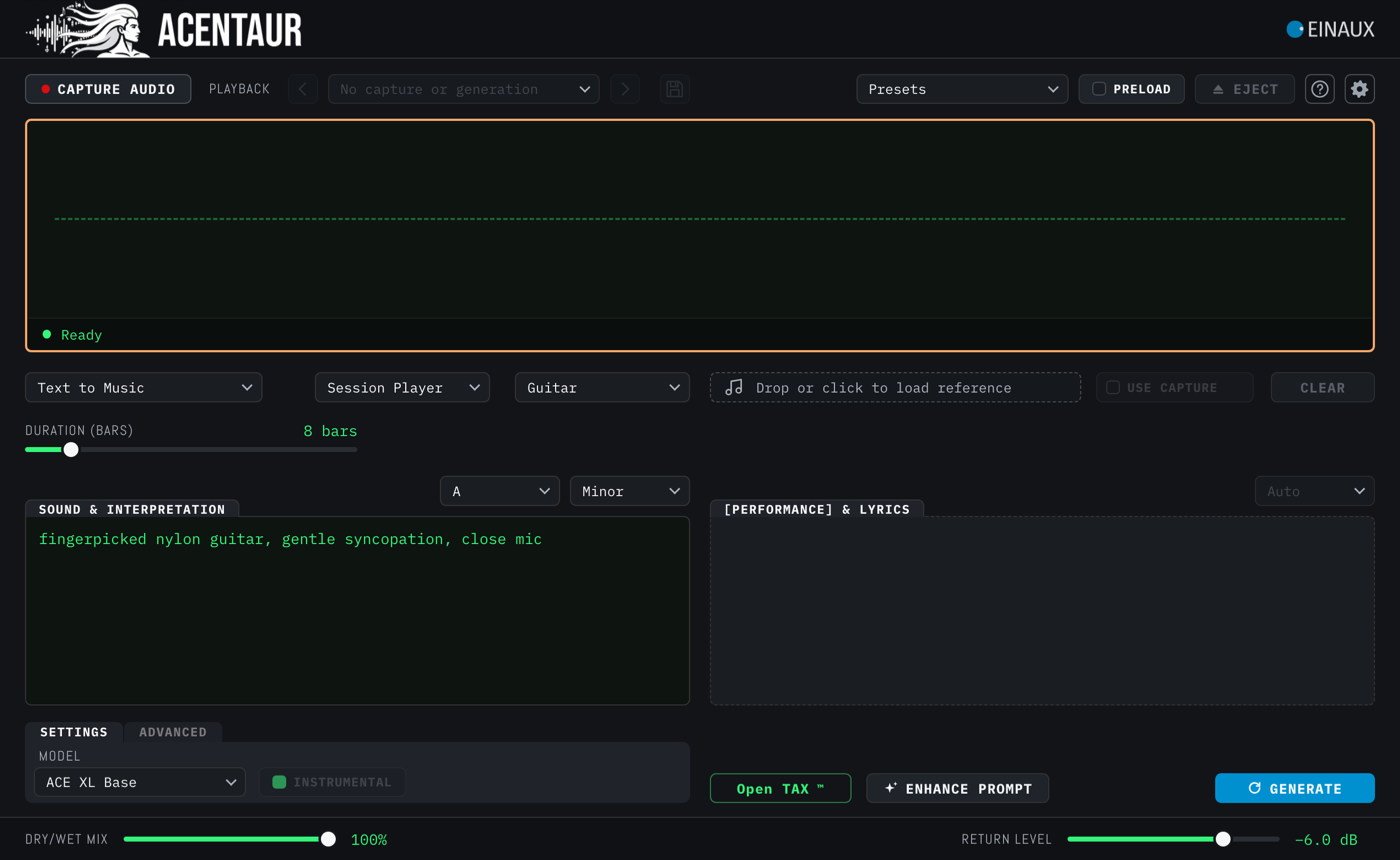
Makes one part, the way a musician would play it. You pick the length in bars and a Layer — Drums, Bass, Guitar, Keyboard, Vocals and so on — and ACENTAUR plays that part alone. This is the setting a new instance starts in.
Composer
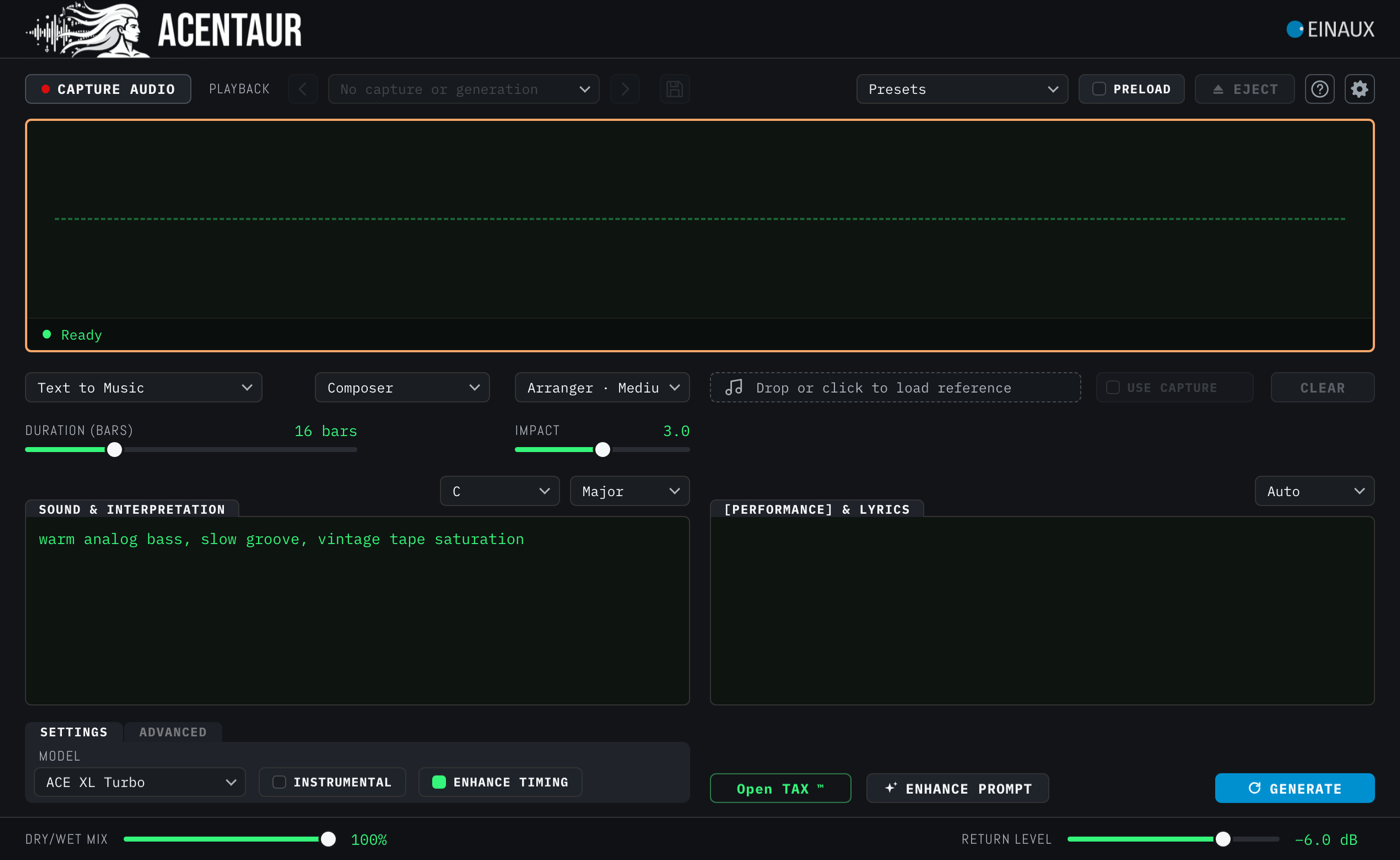
Makes a piece of music from your description, with the full arrangement in one result. This is what Text to Music was before. It offers the Arranger and Impact.
Text to Music as Session Player with Duration in bars and a Layer menu
Session Player: one part, a length in bars, a Layer.
Text to Music as Composer with Arranger, Impact and Enhance Timing
Composer: a whole piece, with Arranger and Impact.
What it does
Creates new audio from a written musical description. No INPUT is required.
Good for
Starting an idea, making a new section, or creating a sound, part, or texture before source audio exists.
What it needs
A compatible Model, a useful SOUND & INTERPRETATION description, and the intended Duration (bars). Lyrics are optional where the Model supports them. Session Player also needs a Layer.
Keep in mind
The result is audio, not MIDI. In Logic Pro, use the source-free setup described under Logic Pro if the plug-in remains silent. Generate waits for one Play in the DAW after a project is reopened; see Generate is unavailable.
Controls that belong to Text to Music
Duration (bars)
How long the piece is. The slider offers as many whole bars as fit into ten minutes at the tempo and meter of your session — 300 bars at 120 BPM in 4/4. It moves in single bars up to 32 and in larger steps beyond, 36, 40 … 64, 72 … 128 and so on; the number beside it always shows the exact value. Stable Audio Models stay at 64 bars.
Arranger
Off, Small, Medium, Large. A language model that plans the piece before a note is made. Larger settings plan in more detail and need more memory and time. Composer only.
Impact
How strongly the Arranger’s plan is followed. Composer only.
ENHANCE TIMING
On the SETTINGS page. Adds a tempo instruction to what the Model reads, so the result starts on the downbeat and holds the session tempo. On by default. Composer only.
ENHANCE PROMPT
Bottom right, next to Open TAX. Asks the Model to write a richer version of your description. It proposes; you decide. The button reads WORKING … while it thinks and DECIDE when a suggestion is waiting — then compare Now and Suggestion and choose Apply or Cancel.
Key
Sets the key and Major or Minor. Text to Music starts on C major, because the Models produce weaker results without any key and it is the field most easily forgotten. A value ACENTAUR chose for you stands in grey italics in the menu; a key you pick yourself stands upright and stays everywhere. The empty entry remains in the menu if you want the Model to decide. With Drums as the target in Session Player, Add Layer or Track Stack, Key and Major/Minor rest: drums are made without a key, which often sounds clearer. The language menu starts on English in the same grey way and rests wherever the lyrics field does.
USE CAPTURE
At the reference slot. Off here unless you switch it on; then the Capture of this instance goes along as the reference. See Controls that apply everywhere.
Presets
Musical starting points and your own saved settings. Available in Text to Music only — see Presets.

Add Layer

What it does
Creates a new musical layer in the context of the INPUT without replacing that source.
Good for
Adding an instrument, vocal part, rhythmic support, texture, fills, or countermelody to an existing passage.
What it needs
An INPUT, ACE Base or ACE XL Base, a Layer, and a description of the new part.
Keep in mind
Add Layer always hears the whole INPUT; there is no selection. The Generation is a separate audio layer. Judge its timing, register, density, and space against the source. With Drums as the Layer, Key and Major/Minor rest: drums are made without a key. The language menu rests wherever the lyrics field does. Every Generate adds to the Capture in use while the waveform follows the last result; to build on a Generation instead, press USE AS CAPTURE while it is shown.
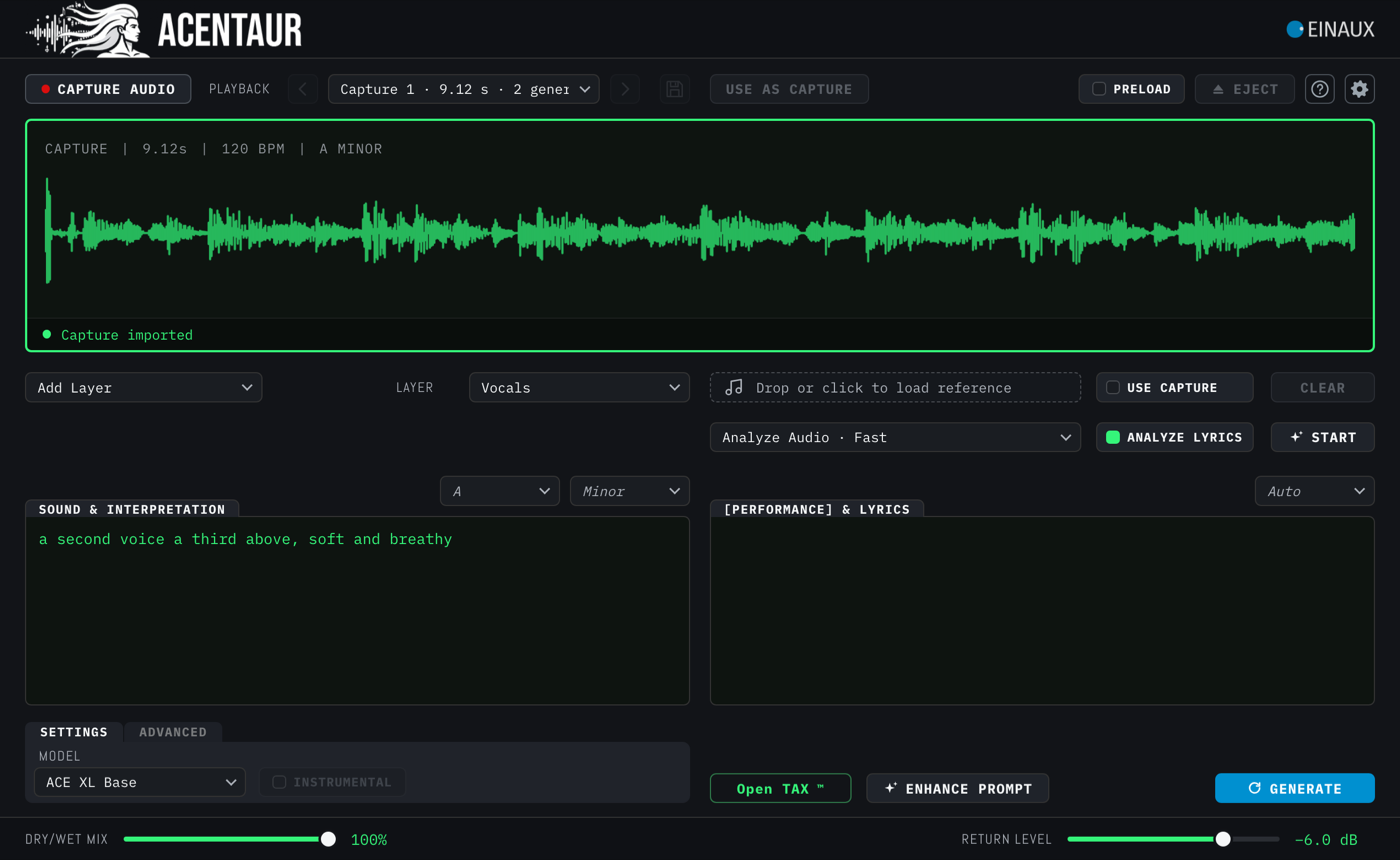
Add Layer with a Capture as INPUT and Vocals as the Layer; ANALYZE LYRICS is lit
Add Layer on Vocals: the Capture is the INPUT, ANALYZE LYRICS is offered because the layer sings.
The layers

Vocals, Background Vocals, Drums, Percussion, Bass, Guitar, Keyboard, Synths, Strings, Brass, Woodwinds, SFX and Other. The Layer decides what the Model plays and whether it sings: on every layer but the two vocal ones, INSTRUMENTAL is set for you and ANALYZE LYRICS rests, because there are no lyrics to find in a part that does not sing.

Analyze Audio writes a description of the INPUT into the left field so you can say what the new layer should add to it. USE CAPTURE is off here until you switch it on.

Choosing Other as the Layer leaves the part open. That is also the one case where you decide yourself whether the new layer sings or not — see INSTRUMENTAL under the shared controls. A take that comes back empty ends with a grey sentence, Add Layer came back silent. Generate again or change the prompt.; see Generate is unavailable.

Track Stack

What it does
Builds and auditions several generated parts as one working arrangement inside ACENTAUR.
Good for
Developing related layers, testing an arrangement, or creating supporting parts around source audio or an empty starting point.
What it needs
ACE Base or ACE XL Base and a Source: Capture or Empty Stack.
Keep in mind
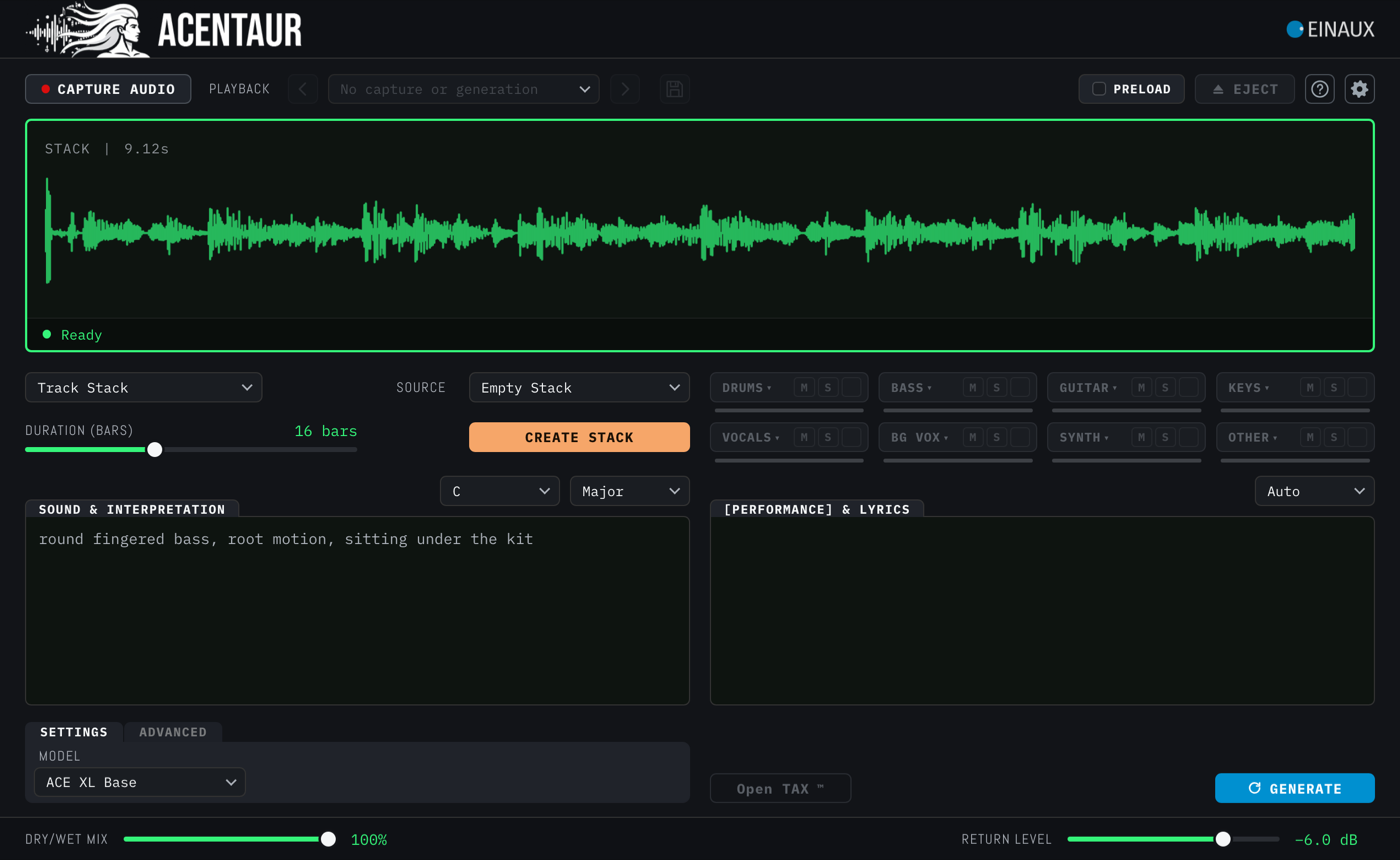
A candidate joins the working stack only after Accept. The check boxes decide which accepted parts the next generation listens to. An Empty Stack starts on C major like Text to Music; with Drums armed, Key rests.
Track Stack with Empty Stack chosen, Create Stack and the eight track buttons with M and S
Track Stack before Create Stack: eight places, each with M and S; the buttons wake up as the stack grows.
The eight places

A Stack has eight places. Seven are fixed: Vocals, Backing Vocals, Drums, Bass, Guitar, Keyboard and Synth. The eighth is yours to choose — Percussion, Strings, Woodwinds, Brass, FX or Other — and it stays that instrument class for this Stack once the first take succeeds.

Each part keeps its own description, lyrics and TAX selection, so you can return to a part and work on it without disturbing the others. Hold the Option key while clicking another track to take the description and the lyrics you were looking at along to it; the status line says in grey what was copied. A plain click switches to that track’s own texts.

The Stack is a multitrack player. Every track button carries M and S and a small fader for listening; they change nothing in the audio, only what you hear. The arrows beside Playback step through the candidates of the current track. Dragging a track button drops that track’s WAV into your arrangement — the accepted take, or the newest candidate.

The Duration (bars) slider of an Empty Stack moves in single bars up to 32 and in steps of four beyond, up to 64.

Cover / Remix

What it does
Reinterprets an INPUT through a new musical or production direction.
Good for
Alternative arrangements, changes of style or ensemble, and new versions that still relate to the source.
What it needs
An INPUT of at least 10 seconds, a compatible Model, and a description of the intended result.
Keep in mind
Cover / Remix always works on the whole INPUT. A waveform selection changes nothing here. The key ACENTAUR hears from the Capture stands in the waveform header and in the Key menu in grey italics; a language it hears from the lyrics is shown the same way. Both are suggestions, one menu away from a correction. Every Generate reinterprets the Capture in use, even while the waveform shows the last result; to continue from a Generation instead, press USE AS CAPTURE while it is shown.
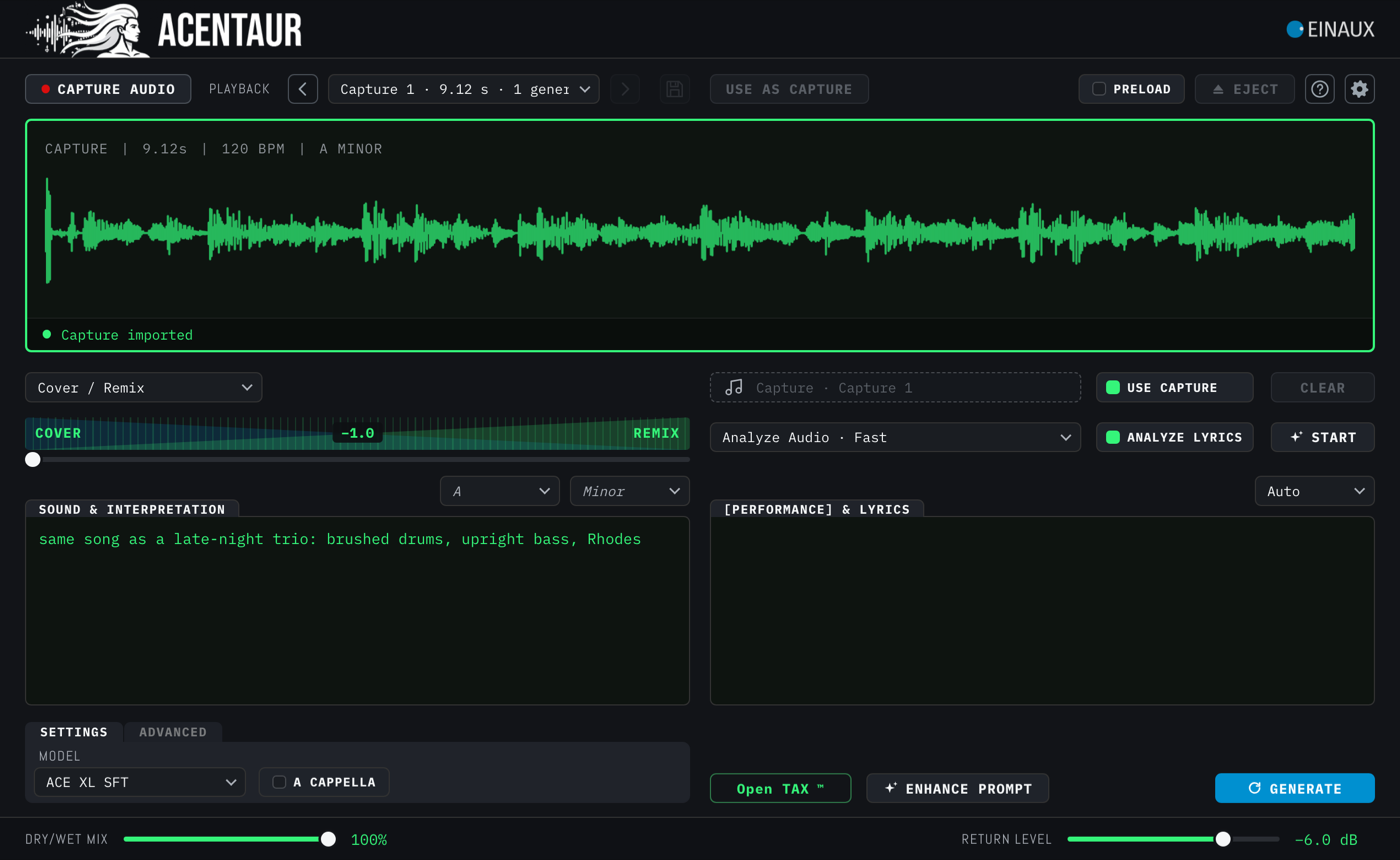
Cover / Remix with a Capture loaded, the COVER to REMIX lane, USE CAPTURE on and the slot reading Capture · Capture 1
Cover / Remix in a new instance: the lane at COVER, USE CAPTURE on, the slot names the Capture that goes along as the reference.
COVER ↔ REMIX

One lane with five stops: −1.0, −0.5, 0, +0.5, +1.0. At −1.0 the result stays closest to the source and re-performs it; at +1.0 the written direction takes over and the source is a starting point. The stops in between are real positions, chosen by ear; there is nothing between them. A new instance starts at −1.0.

USE CAPTURE is on in a new instance, and for good reason: short Captures come out far cleaner with the SFT and Base Models when the Capture goes along as the reference. Switch it off and Captures under about 20 seconds may come back rough with those Models; the Turbo Models are less sensitive. A reference of your own in the slot wins over the Capture in either case.

A CAPPELLA on the SETTINGS page asks for voices only; it adds that to the description rather than muting anything. Analyze Audio writes a description and, with ANALYZE LYRICS on, a lyrics draft of the INPUT for you to start from; START reads CANCEL while it runs.

Edit

What it does
Changes existing audio through one of three different contracts: Repaint, Retouch, or Flow.
Good for
Working on material that already has a useful musical role but needs a local replacement, a broader restatement, or a defined transformation.
What it needs
An available source — a Capture or a Generation — a compatible Model, and the right Type for the intended change.
Keep in mind
Edit works on the Capture in use, and the waveform follows each new Generation so you can hear it. To edit a Generation, press USE AS CAPTURE while it is shown, or simply draw a selection on it: a selection on what you see makes the shown audio the input. Where a Type allows a selection and you make none, the whole source is processed.

The Arranger does not appear in Edit. The Models plan their own way through an existing piece of audio, so there is nothing for it to do.

Repaint

What it does
Generates a replacement for one selected interval while keeping the surrounding source as context.
Good for
Replacing a phrase, fill, transition, note group, or other clearly bounded moment.
What it needs
A compatible source and a target of 3 to 90 seconds. Without a selection the whole source is the target. With a selection, at least 0.25 seconds of source must remain outside it, so the Model has context. A Stable Audio Model works with a selection only.
Keep in mind
Listen across both boundaries of the selection. Strength is most useful when the source, selection, description, and seed stay unchanged for comparison. A drawn selection also names the input: what you draw on is what Repaint works on.
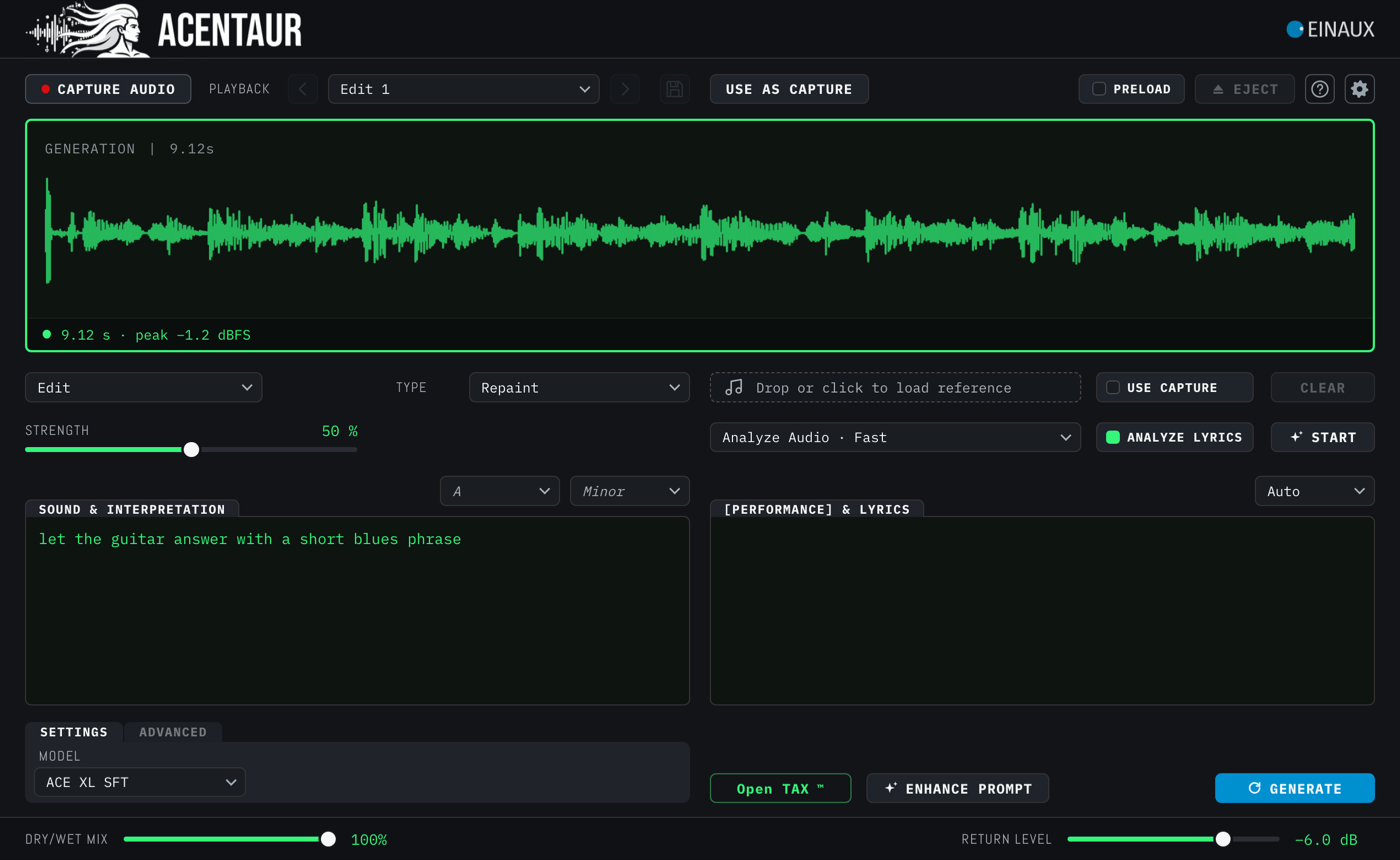
Edit in the Repaint type on a Generation, with the Strength slider and Analyze Audio; USE AS CAPTURE is awake
Repaint without a selection on a shown Generation: the whole Generation is the target. USE AS CAPTURE is awake because a Generation is shown.
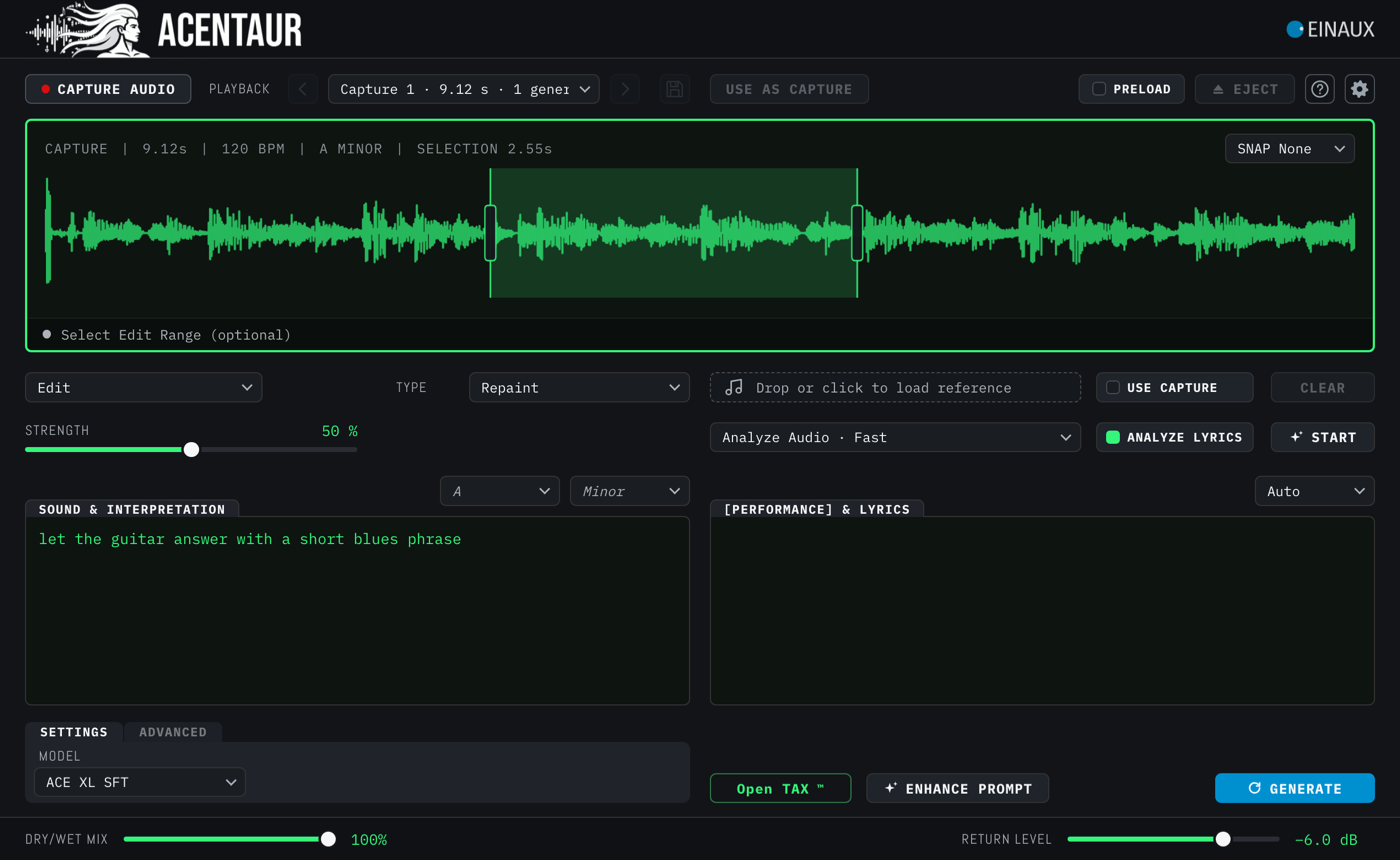
Repaint with a selection drawn on the Capture and the selection length in the waveform header
With a selection: the header shows its length, and the selection names the input, here the Capture.

Retouch

What it does
Restates or reshapes a source across the whole audio or an optional selected interval.
Good for
Changing instrument character, performance, texture, or production while retaining useful information from the source.
What it needs
An ACE Model, a source and a description of what should sound different. The target is 3 to 90 seconds; a waveform selection limits the area being worked on.
Keep in mind
Conservity changes the balance between preservation and change. Compare it while the source, description, and seed remain fixed. A drawn selection names the input: what you draw on is what Retouch works on.

Flow

What it does
Moves from a described SOURCE state toward a different TARGET state.
Good for
Transformations where the starting character and intended destination both matter.
What it needs
A source, a meaningful SOURCE description or an analysis of it, and a TARGET that differs from SOURCE.
Keep in mind
Define the destination before generation. Whitespace alone is not a musical difference, and GENERATE remains unavailable while SOURCE and TARGET are identical.
Edit in the Flow type: SOURCE and TARGET tabs on both text fields, CHANGE under TYPE, Flow Base on the SETTINGS page
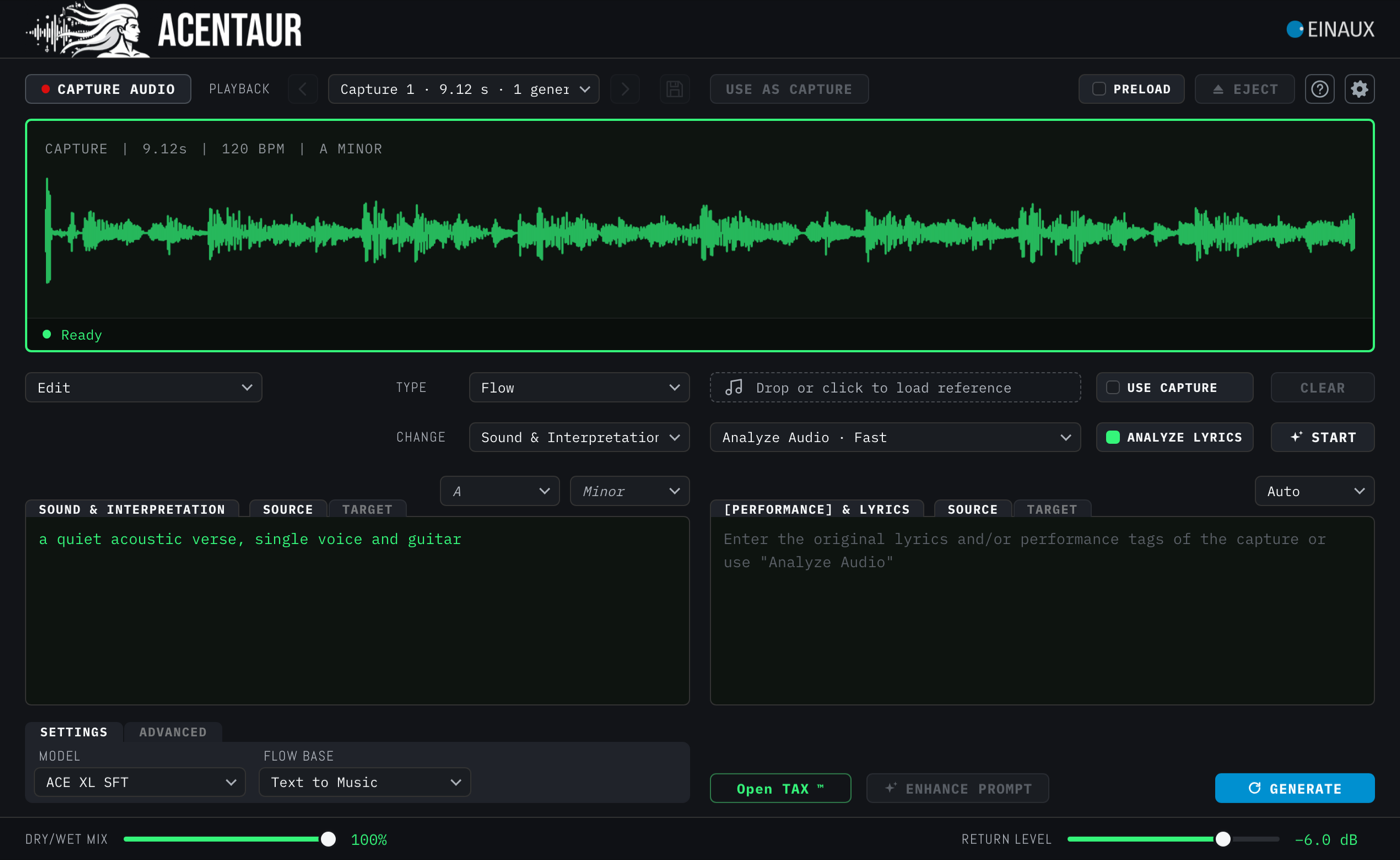
Flow: the SOURCE and TARGET tabs sit on the text fields, Change under Type, Flow Base on the SETTINGS page.
How Flow is organized
SOURCE and TARGET
Two tabs next to the name of each text field. The lit one is the page you see; both fields switch together. SOURCE describes what is heard now, TARGET what should be heard after the transformation.
Analyze Audio
Writes a Fast or Detailed SOURCE description for you, with a lyrics draft when ANALYZE LYRICS is on.
Change
Under Type. Chooses whether the change concerns Sound & Interpretation, Lyrics, or Both. It decides what Flow is allowed to touch.
Flow Base
On the SETTINGS page. Chooses Text to Music or Cover / Remix as the generation basis.
Describe SOURCE or choose Analyze Audio

Flow still needs a meaningful starting description.

SOURCE and TARGET are identical · edit TARGET before Generate

Open TARGET and make a real musical change. The status line explains why Generate is unavailable.

Retake

What it does
Creates another performance of a request you have already made.
Good for
Trying sibling takes when the musical request is already right but the performance can vary.
What it needs
A Generation made on this Mac that ACENTAUR can pin as the baseline — from Text to Music in either type, Cover / Remix, Add Layer, Extract, Repaint, Flow, or a Track Stack take. Results rendered on ACENTAUR Net cannot be retaken.
Keep in mind
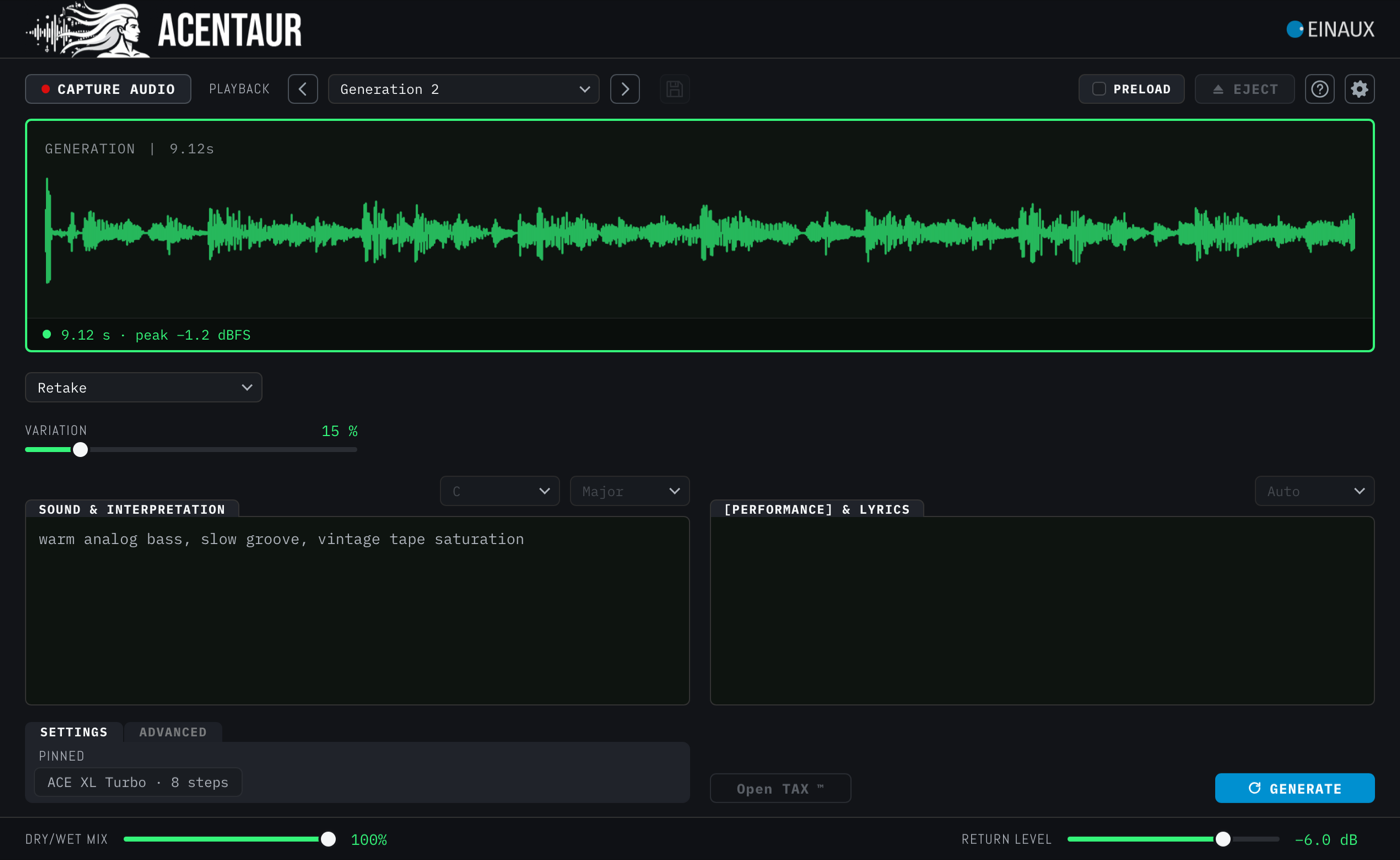
The inherited request, Model and steps stay locked — where the SETTINGS page usually offers a Model, Retake shows Pinned · ACE XL Turbo · 8 steps — and the text fields are read-only. Variation, Batch, and the Retake Seed on the ADVANCED page create the comparison.
Retake with a selected Generation, the Variation slider and the pinned Model on the SETTINGS page
Retake: the request is pinned, only Variation, Batch and the Retake seed change.

A Retake plays where its original played. It takes the position of the Generation it came from, not the current playhead. The arrows beside Playback are a quick way to pick the take to retake.

Extract

Extract pulls one part out of a Capture or a Generation and plays it on its own: the lead vocal, the drums, the bass. It is not stem separation, and it helps to know the difference before you use it.

Not a separator

A stem separator cuts the mix apart. Because the pieces have to add back up to the original, each one is left with holes where the others were — like a painting cut into pieces: where a hut stood on the mountain, the mountain now has a hole, and if you want the trees on their own, the mountain comes out frayed.

Extract traces the part instead. The Model listens to the whole mix, guided by your description and the lyrics, and performs the part again. What the mix covers up, it fills in from the context as well as it can. The parts you extract do not add up to the original mix, and that is not the point: you extract a part to do something else with it.

Sometimes it takes patience. Where the Model guessed a gap wrongly, another try with a different seed, a longer selection or a longer Capture helps. Vocals are the most reliable, because the lyrics anchor the Model in time; bass and guitar succeed less often. And because the part is performed, not cut out, a different description can recolour a voice while melody, timing and words stay — something no separator can do.

Two ways of asking are in the Mode menu.

Auto
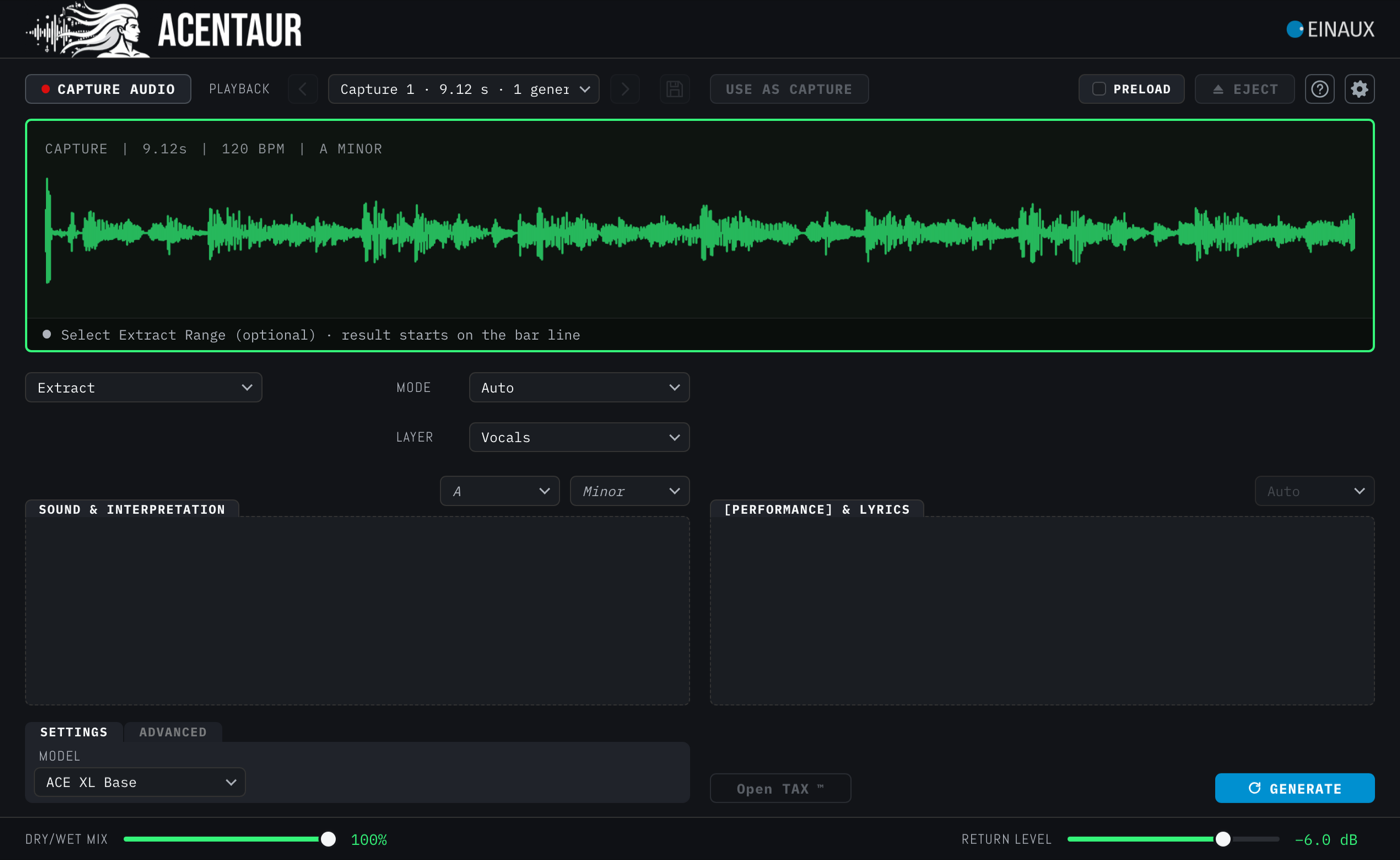
The Model’s own extraction. It takes only the Layer; the text fields, Key, Language and TAX rest. This is the setting a new instance starts in, on Vocals.
Custom
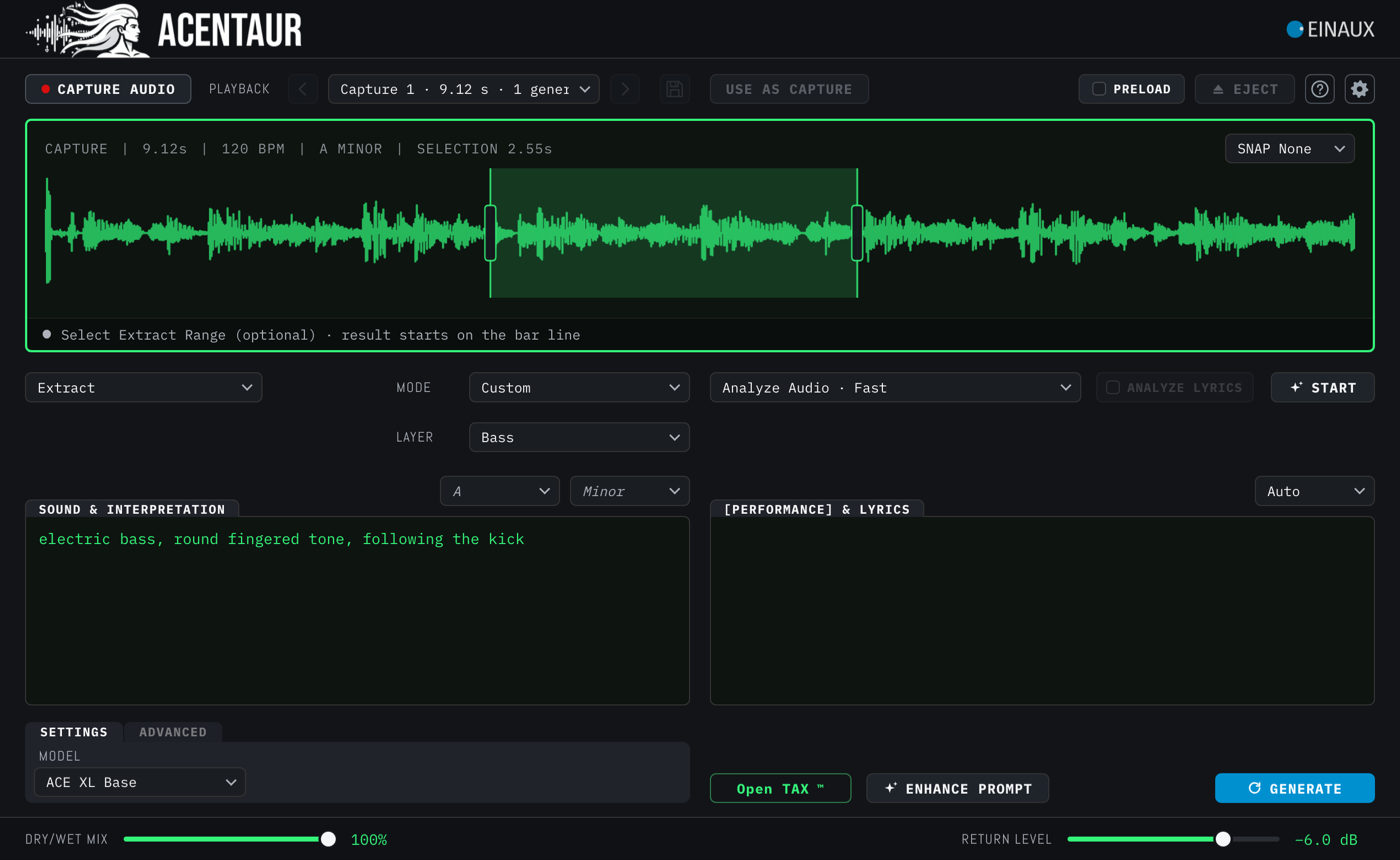
Extract with a description, lyrics and a selection in the waveform. Use it when Auto does not find the part, or to isolate a short passage on purpose. Two ways are worth trying, and neither is always the better one: run Analyze Audio on the source and extract with the description and the lyrics it writes into the fields; or describe only what you want out — a short prompt for the target part alone, without the rest of the mix.
Extract in Auto on Vocals with a Capture loaded; the text fields rest
Extract in Auto: only the Layer counts, the text fields rest.
Extract in Custom on Bass with a description and a selection drawn on the Capture
Extract in Custom with a selection: only the selected passage goes to the Model and only that passage comes back.
What it does
Performs one instrument or voice of the shown audio again as a separate take, in time with your arrangement.
Good for
Getting a vocal, a bass line or a drum part out of a mixed Capture to work on it alone, re-singing or re-playing a part with the same melody and timing, or isolating a short moment of a Generation.
What it needs
A Capture or a Generation, ACE Base or ACE XL Base, and a Layer: Vocals, Background Vocals, Drums, Percussion, Bass, Guitar, Keyboard, Synths, Strings, Brass, Woodwinds or SFX.
Keep in mind
A selection is optional. Without one, the whole audio goes in and the whole part comes back; with one, only the selected passage goes to the Model and only that passage comes back, placed on the bar line where it started. A short selection with a fitting description is the way to isolate a phrase. More material helps the Model hear the part: a longer selection or a longer Capture.
What the status line says
Select Extract Range (optional) · result starts on the bar line
Grey. Ready to go; draw a selection or press GENERATE.
Extract came back silent: bass not recognised. Try a longer selection or a longer Capture.
Grey. The Model did not find the part in what it was given. It says not recognised, never not there: you hear the part, the Model did not. Give it more to work with, try another seed, or switch to Custom and describe the part.

Extract has no reference slot: the source is its own context. There are no Guidance, Shift or Mask controls either; the mask follows your selection by itself. A Generation from Extract is named Extract 1, Extract 2 and so on in the Playback menu unless you wrote a description. Like every other Mode, Extract works from the Capture in use; to extract from a Generation, press USE AS CAPTURE while it is shown.

Audio Analysis

What it does
Writes a music description and a lyrics draft from audio, and hears its key and language. It reads; it does not generate.
Good for
Understanding source material, preparing an editable description, or obtaining a lyrics draft before the next decision.
What it needs
The Audio Analysis package installed and an audio source — an imported file, a Generation, or a Capture. Detailed needs the detailed package as well.
Keep in mind
Both results are drafts. Check them against the audio before you build on them. The result is kept in Global History.
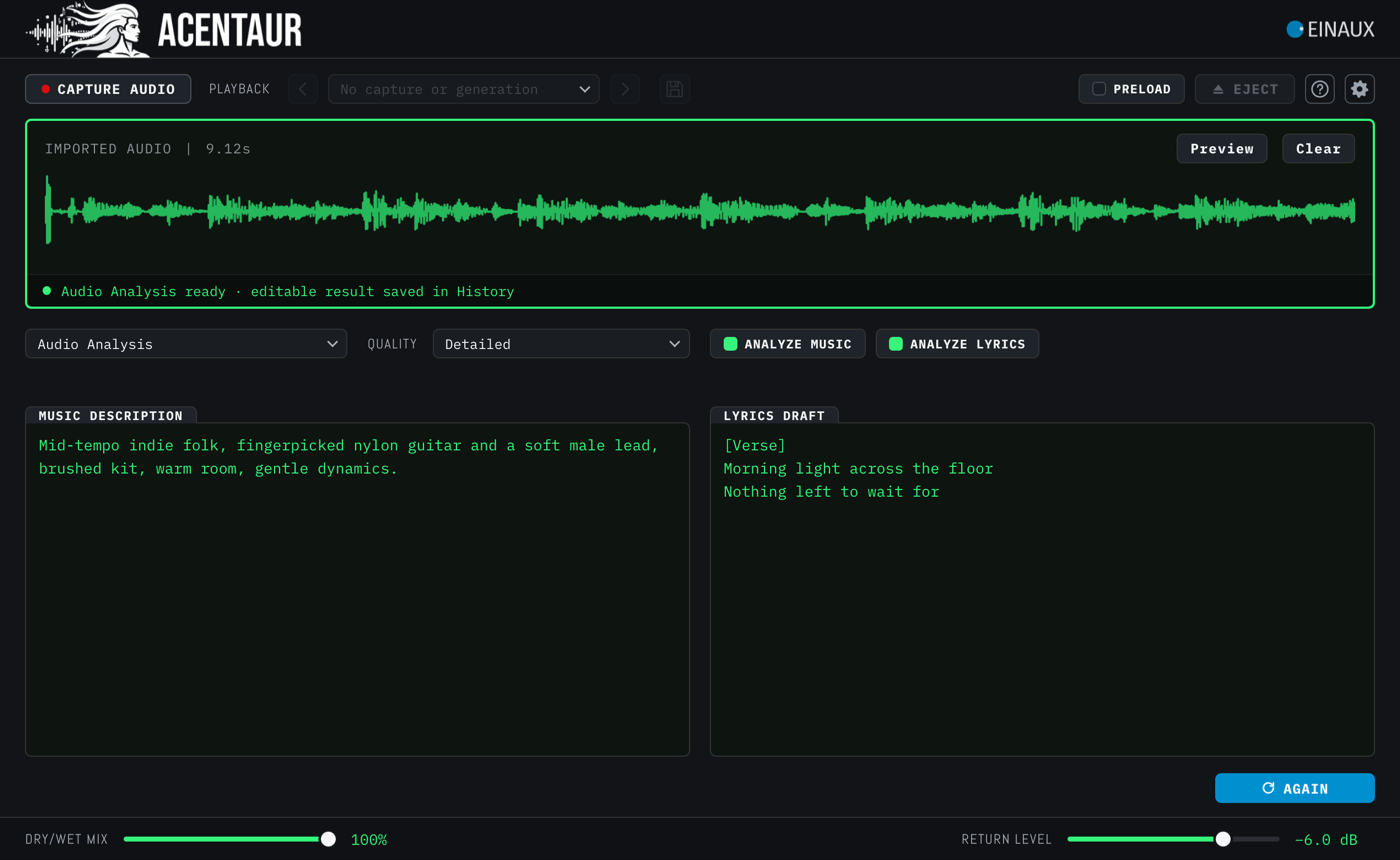
Audio Analysis after a run on an imported file: ANALYZE MUSIC and ANALYZE LYRICS lit, both fields filled, the button reads AGAIN
Audio Analysis after a run: the two switches decide what the next run hears, the button reads AGAIN for the same source.
The two switches
ANALYZE MUSIC
Writes the music description into the left field, at the chosen Quality, and hears the key. Off: that field stays as it is, and Quality rests.
ANALYZE LYRICS
Writes the lyrics draft into the right field and hears the language from it. Off: the field stays as it is, and no language is guessed.

Both are on to begin with; one always stays on. What a run hears goes into the fields as a draft — and, when you switch to a Mode that generates, the key and the language stand in their menus in grey italics as suggestions.

Audio Analysis runs from GENERATE, in its usual place: it reads ANALYZE for a new source, CANCEL while the analysis runs, and AGAIN once the shown source has been analysed. A cancelled run leaves the fields as they were. In Cover, Add Layer, Edit and Extract the same analysis runs from START in the right half, next to the Analyze Audio menu.

Presets

A preset is a musical starting point: the description, the lyrics, the Mode, the Model, the seed and the settings that go with them. It holds no audio and nothing from your session. Because the seed travels with it, a preset brings back the take it was made from — as long as your session runs at the tempo, meter and length it names.

Starter · …
Fifty starting points that ship with ACENTAUR, chosen by ear and sorted into groups — Drums & Percussion, Bass, Keys & Guitars, Vocals, Brass, Winds & Strings, Synths & Pads, Atmospheres & Textures, Cinematic & FX, Songs & Grooves. Set your session to the tempo in the name, then Generate. Clear the seed for a new take.
My presets
What you saved yourself. Sub-folders are recognised, so you can sort them.
Save as preset…
Keeps the current settings under a name, with the seed of the take you are listening to. A seed you typed yourself stays as it is.
Load preset file…
Opens a preset from anywhere on disk.

Loading a preset replaces the text it belongs to and leaves your other Modes, your sources and your Generations alone. If the preset uses a Model that is not installed on this Mac, the status line names the package to install in Settings — ACE 2B, ACE XL or Stable Audio.

Presets appears in Text to Music only — in both Session Player and Composer. In every other Mode the menu is hidden, because a starting point is only a starting point where there is nothing to start from. The disk symbol next to Playback is something else: it sets where your audio is saved.

Controls that apply everywhere

The panel at the bottom left has two pages. SETTINGS holds the Model and the few switches that belong to the Mode; ADVANCED holds what you set once and rarely touch. Which page is open is not saved with the project.

The ADVANCED page with Steps, Batch, Seed, KEEP SEED and HP FILTER set to 60 Hz and 12 dB
The ADVANCED page: Steps, Batch, Seed, Keep Seed and the high-pass at 60 Hz / 12 dB.
Model
SETTINGS. Which Model does the work. The menu only offers what the current Mode allows. A Model name is a promise: ACENTAUR never quietly uses a different one.
INSTRUMENTAL, A CAPPELLA, ENHANCE TIMING, Flow Base
SETTINGS, each only in the Mode it belongs to. INSTRUMENTAL and A CAPPELLA decide whether the result sings. Where the Mode already knows the answer — a Drums layer does not sing — the switch shows you that answer greyed. Where the choice is really yours, in Composer and with an Other layer, you make it. Stable Audio Models know no lyrics: with either of them the lyrics field rests grey with its content, the language menu with it, and INSTRUMENTAL is not offered.
Steps
ADVANCED. How much work the Model puts into one result. Turbo Models run at 8 or 10; the others between 32 and 100.
Batch
ADVANCED. How many results one press of GENERATE produces.
Seed and KEEP SEED
ADVANCED. The starting point of the randomness. Left empty, AUTO, it is chosen for you. KEEP SEED holds on to the one just used, so you can change a single thing and hear only that change.
HP FILTER Hz/dB
ADVANCED, right of the seed: two rows, 20 40 60 hertz and 6 12 18 decibels per octave. Click a value to switch the filter on; click the lit value again to switch it off; all grey is off, and that is how a new instance starts. Pick one row and the other fills in with its middle value, 40 Hz or 12 dB, so a lit setting is always complete. The filter is zero-phase and is applied by ACENTAUR to every finished take, in every Mode; it is stored with the take and with your project. The same seed with another setting gives the same take with a different low end. Every take carries a faint noise floor below about 200 Hz from the Model; on a single voice it is invisible in a mix, on thirty stacked tracks it takes a decibel off a limiter. Vocals and guitars: 60 / 12. Bass and drums: off, or 20 / 6.
USE CAPTURE
At the reference slot, left of CLEAR, in every Mode with a slot. On: the Capture in use goes to the Model as the reference, and the slot says so in grey, Capture · Capture 1. It is always the Capture in use — a new Capture, or another one chosen in Playback, is taken by itself; a Generation shown in the waveform is not. A reference of your own in the slot wins, and the button rests while it is there. Without a Capture the button rests. It is on in a new instance in Cover / Remix and off elsewhere, and each side remembers its own setting.
CLEAR
Removes the reference from the slot. It rests while there is nothing to clear.
USE AS CAPTURE
In the utility row, in Cover / Remix, Add Layer, Edit and Extract. The Capture is always the input of these Modes, while Playback and the waveform follow each new Generation so you can hear it. This button makes the Generation you are looking at a Capture of its own, at the same place in your arrangement: it appears under Captures in the menu, the original Capture stays there too, and its key is heard like any Capture’s. It rests while the waveform shows the Capture itself, a reference, a Track Stack mix, or nothing.
Key and Language
Above the text fields. A value ACENTAUR chose — C major in Text to Music, the key heard from a Capture, English or the language heard from the lyrics — stands in grey italics; a value you chose stands upright and is never touched. The three languages in the menu are chosen in Settings; Auto lets the Model decide. The menu rests wherever the lyrics field does.
Playback and the arrows
The menu shows your Captures with their length and number of Generations, then your Generations, named after their description or, without one, after their Mode: Add Layer 1, Cover 2, Edit 1, Extract 3. The arrows beside the menu step to the previous and the next Generation; they never step into a Capture, because choosing a Capture changes what the next take is made from. From a Capture, the left arrow goes to the newest Generation. Both rest while a take runs. Pressing GENERATE never switches what you see: the waveform shows the new Generation only when it is ready.
The reference slot
Takes a file, a region from your DAW, or a Generation dragged out of the waveform. A reference is on or off; there is no strength control.
Dry/Wet mix and Return level
What leaves ACENTAUR: the balance between source and Generation, and the output level.
PRELOAD and EJECT
In the utility row. Load a Model into memory before you need it, or give the memory back. The status line names the Model as the menu does while it loads, Loading ACE XL Turbo …, and switches to the new name the moment you change the Model.

Empty text fields are allowed everywhere. Nothing in ACENTAUR is a switch without an effect: a setting a Mode cannot honour is refused with a reason in the status line rather than silently ignored.

03 · TAX™

TAX™ — Timbre, Articulation & eXpression

We built TAX™ so musicians can choose terms they already use: musical style, musical role, articulation, density, register, rhythmic feel, dynamics, production space, and recording character. TAX compiles the selection into ordinary musical English and returns it to SOUND & INTERPRETATION, where it remains visible and editable. The instrument comes first; style and production close the prompt.

Open TAX, at the bottom right of the surface, opens a page of its own. The Mode’s controls step aside while you work there, and ‹ BACK returns you with your text. Help and Settings stay reachable throughout.

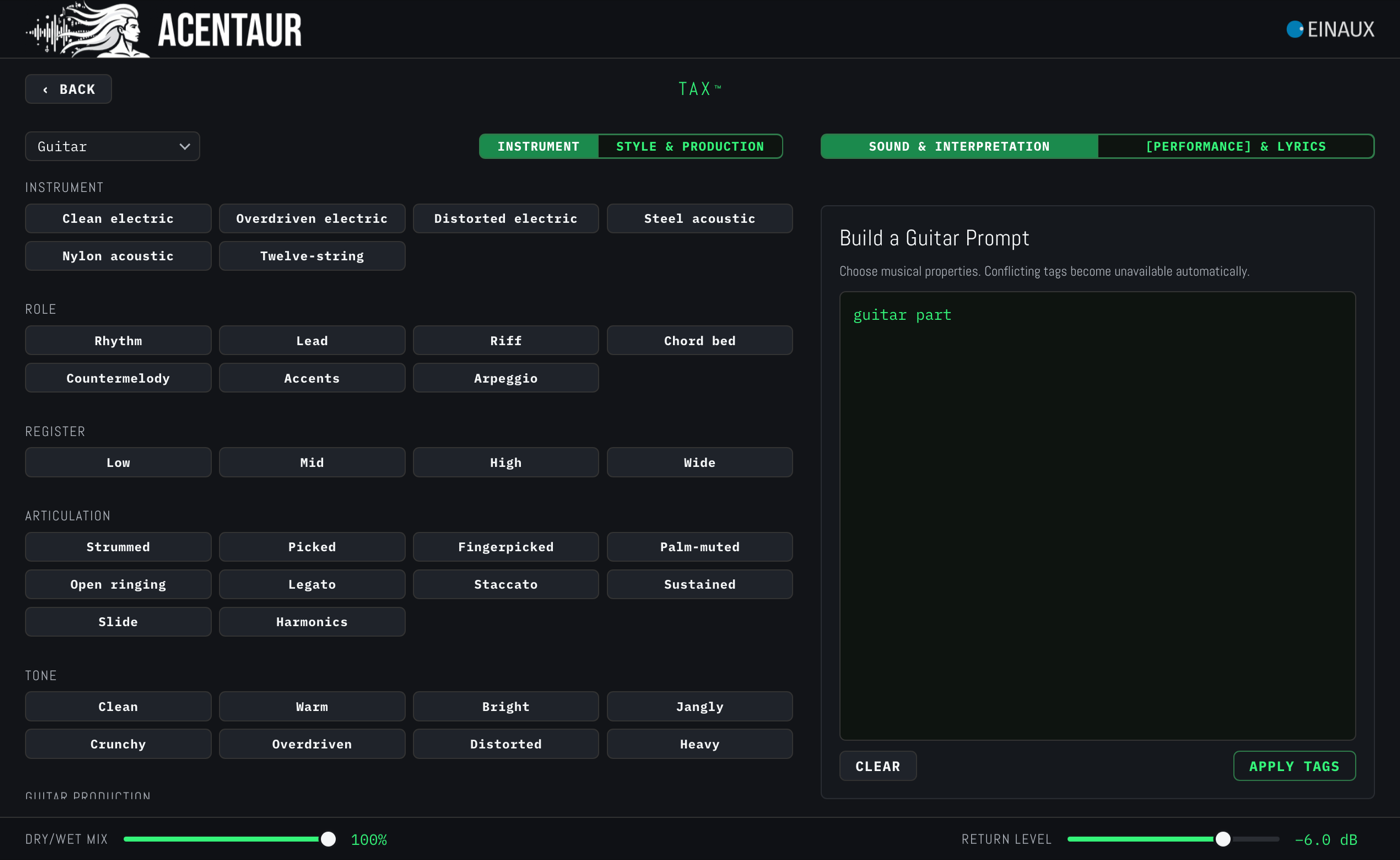
The TAX page Sound & Interpretation, Instrument sub-page, with the groups of the chosen instrument
TAX, Sound & Interpretation: the instrument leads.
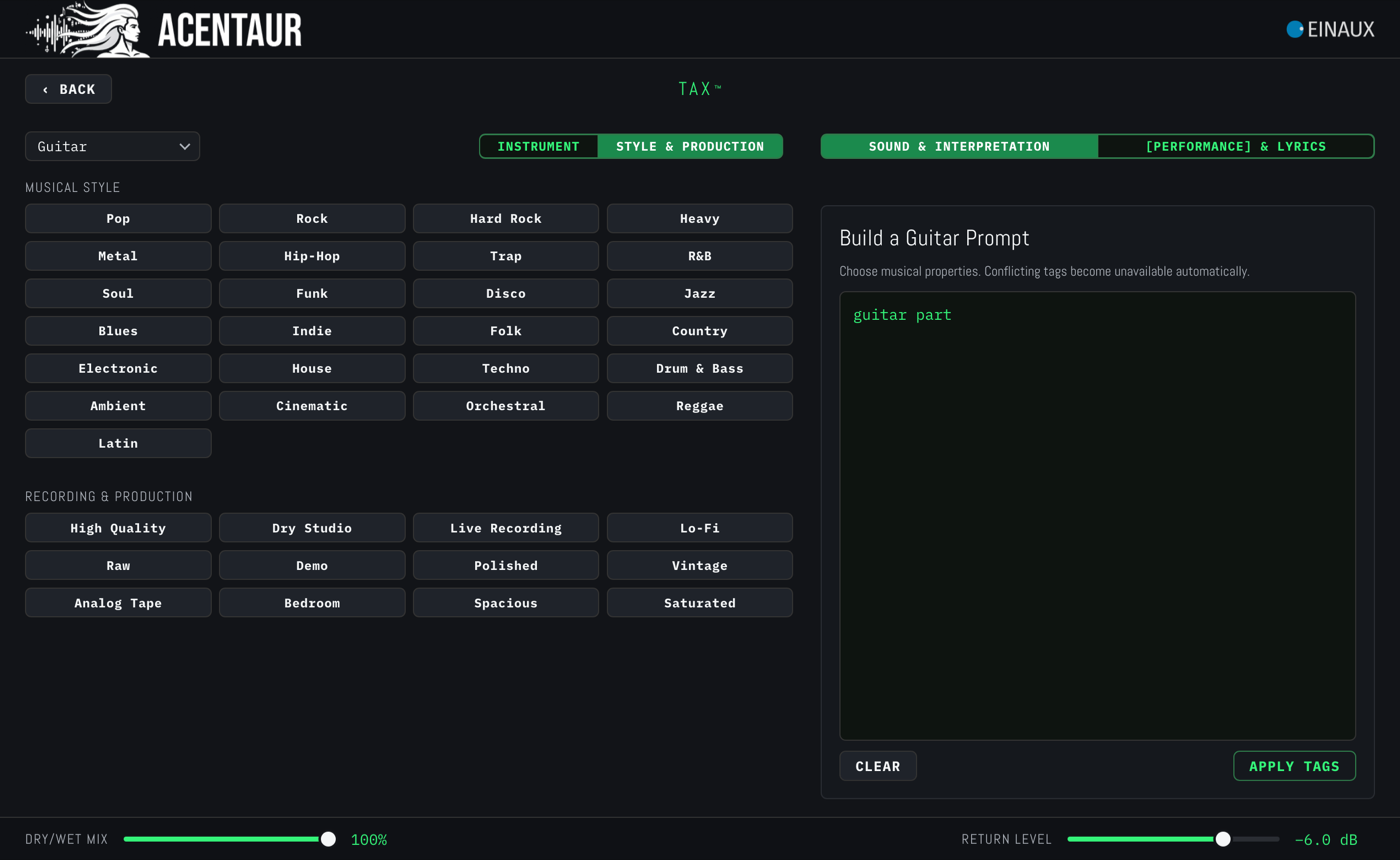
The TAX sub-page Style & Production with musical style and recording character
TAX, Style & Production: style and production close the prompt.
The TAX page [Performance] & Lyrics with structure and performance marks
TAX, [Performance] & Lyrics: marks go into the lyrics draft at the cursor.
SOUND & INTERPRETATION
Two pages: INSTRUMENT holds the groups of the selected instrument, STYLE & PRODUCTION holds musical style and recording character. Selections on both pages stay in the prompt. APPLY TAGS changes only SOUND & INTERPRETATION.
[PERFORMANCE] & LYRICS
Adds structure, energy, instrumental-passage, arrangement, or ending tags at the cursor; vocal-delivery tags appear for Vocals and Backing Vocals only. Tags that touch each other with no lyrics between them describe one moment, so a new tag of the same kind replaces the old one there: Chorus replaces Verse, High energy replaces Low energy. Applying here changes only the lyrics.
Where TAX is available
Text to Music, Cover / Remix, Add Layer, all three Edit Types, and Track Stack. With a Stable Audio Model, only the sound page appears — those Models do not sing.
What TAX does not promise
TAX is ACENTAUR’s own taxonomy, not an official Model vocabulary. Its terms guide a Model; the generated audio remains the result to judge.

In Track Stack, TAX keeps the selected track’s instrument fixed. The card on the right shows what the prompt will become, with CLEAR and APPLY TAGS. Applied text can still be edited freely after you return.

Practical prompting strategies

ACE Step Prompting Guide

Working with ACE: Prompts, Variations and Model Limits

The Sound & Interpretation field is ACE-Step's caption: the overall portrait of the music. A compact list of compatible musical attributes is usually more reliable than prose full of commands.

role or genre, instrumentation, groove, interpretation, timbre, recording or space

Genre R&B, neo-soul, synth-pop, jazz-funk, ambient, indie rock
Rolesupporting bass, sparse counterline, lead hook, restrained backing vocals
Rhythmstraight eighth notes, laid-back pocket, syncopated, halftime, four-on-the-floor
Interpretationpalm-muted, fingerstyle, breathy, restrained vibrato, tight unison
Timbrewarm, airy, crisp, punchy, dark, rounded, saturated, dry
Productionclose-miked, dry studio recording, roomy live kit, polished modern mix

Good palm-muted clean electric guitar, sparse funk counterline, straight sixteenth notes, warm amp, dry studio recording

Bad make it amazing, modern and vintage, very simple but complex, no drums, exact melody, perfect mix

  • Keep the caption and Lyrics field consistent. Contradictory instruments, energy or vocal directions reduce quality.
  • Use the dedicated key, tempo, time-signature and duration controls instead of repeating those values in the caption.
  • Negative wording is soft conditioning, not a guaranteed mute. Prefer a positive target: “solo dry vocal” is usually clearer than a long list beginning with “no”.
  • Change one variable at a time and use KEEP SEED when judging prompt changes.
  • Empty prompt and Lyrics fields are allowed. The result will simply be less directed.
  • Keep the sound prompt concise. ACE-Step's public input limits are 512 characters for the caption and 4096 characters for Lyrics.

Temporal script

Lyrics and useful tags

Lyrics are not only words. ACE-Step also treats the field as a loose timeline for sections, performances and energy. Tags guide generation; they are not sample-accurate commands.

PurposeUseful tagsNotes
Song structure[Intro] [Verse] [Verse 1] [Pre-Chorus] [Chorus] [Bridge] [Outro]Put a section tag on its own line and separate sections with blank lines.
Energy and arrangement[Build] [Drop] [Breakdown] [high energy] [low energy] [building energy] [explosive]These are tendencies, not hard automation.
Instrumental passages[Instrumental] [Guitar Solo] [Piano Interlude] [Drum Break][Instrumental] is the clearest way to request no sung words. The INSTRUMENTAL switch next to the lyrics field does exactly this for you: it sends the tag on its own and keeps your lyrics untouched.
Vocal delivery[whispered] [raspy vocal] [falsetto] [powerful belting] [spoken word] [harmonies] [call and response] [ad-lib]Keep the same vocal direction in the sound prompt.
Mood[melancholic] [euphoric] [dreamy] [aggressive]Use sparingly; complex mood belongs in the sound prompt.
Ending[Fade Out] [Silence]

Compact vocal example

[Verse - intimate]
The room is cold and quiet
I hear the city breathe

[Chorus - powerful]
WE ARE STILL ALIVE
(still alive)

Instrumental development

[Intro - ambient]

[Main Theme - piano]

[Build]

[Outro - fade out]

Lyrics tips

Aim for roughly 6–10 syllables per line and similar line lengths within a section. Parentheses can suggest backing vocals. Uppercase can increase intensity. Do not stack many instructions inside one bracket; [Chorus - anthemic] is clearer than six competing modifiers. ACENTAUR never writes lyrics into a generation on its own. Audio Analysis and Analyze Audio can write a lyrics draft from existing audio; treat it as a draft and check it against what is sung, because plausible-looking words can be wrong.

Key controls

  • Duration (bars) on the grid of your session
  • Host tempo and time signature
  • Key and Major or Minor; Text to Music starts on C major as a suggestion
  • Arranger in Composer: Off, Small, Medium or Large
  • Impact in Composer: how strongly the Arranger’s plan is followed, 2.5 to 3.5, default 3.0; it rests while the Arranger is off
  • ENHANCE PROMPT: a rewritten description to compare side by side with yours, applied only when you choose Apply

Optional Reference Audio

Use a separate sonic example when the text alone does not communicate the intended performance, timbre or production. It remains a reference, not a timing or melody template. A reference is simply on or off: load it and it guides the result, clear it and it doesn’t. There is no strength control, because the old one never set the strength of the reference — below 100% it replaced the source with silence. Cover / Remix keeps its own lane.

Prompt patterns

dry acoustic drum kit, neo-soul pocket, tight kick and rimshot, sparse ghost notes, no melodic instrumentsdark analog synth-pop, pulsing bass, restrained female alto, intimate verse, wide anthemic chorus, polished studio mix

Limitations

BPM, key and bar length are conditioning anchors rather than a MIDI grid; the generated performance can drift. Very long durations may repeat, and an 8-bar request can end after 6 or 7 bars: the file has the exact length and starts on the downbeat, but the model composes an ending and often leaves the last one or two bars quiet. Ask for two bars more and shorten the region in your DAW, or work in 4-bar phrases. The Arranger writes a plan for the piece in Composer; it takes no part in Modes that start from existing audio, and Impact is not a general creativity control.

04 · ACENTAUR NET

Use another Mac for generation and analysis

Keep the DAW on one Mac and let another Mac with ACENTAUR do the generation and analysis.

What ACENTAUR Net is

ACENTAUR Net lets the plug-in use the Models and processing of another Mac. This can be a stronger studio Mac, a machine in another room, or a Mac in another location while a lighter laptop runs the DAW.

The render Mac needs its own ACENTAUR activation and the Models the chosen Mode requires. It serves one DAW Mac at a time: whoever connects first. It is your own Mac, not an EINAUX cloud service — your audio travels only between your two machines.

While ACENTAUR Net is on, the plug-in works with the Models of the render Mac, not your local ones, and PRELOAD and EJECT rest. Everything that comes from the render Mac is marked blue: the waveform, its frame, the progress bar and the drag field. Blue says where a result came from, never that something is wrong.

Local network

  1. On the render Mac: open Acentaur Settings and switch on Use this Mac as render server. The line next to it reads On · Port … once it is ready.
  2. On the DAW Mac: open ACENTAUR. When a render Mac is found in the same network, ACENTAUR NET appears at the lower right, next to ENHANCE PROMPT, with Host ready above it. No address has to be typed in.
  3. Switch on ACENTAUR NET. The status line reads Connecting to the render Mac · confirm there ….
  4. The first time only: a dialog on the render Mac asks whether this Mac may render there. Allow it. The approval is remembered, so the question does not come back; unanswered, it counts as refused after two minutes.

Macs you have approved are listed on the render Mac under Paired Macs, where each approval can be removed again.

Different locations

For two Macs in different places, Tailscale supplies the private network between them. It is a separate service and must be installed and connected independently from ACENTAUR. There is no Tailscale selector and no address field in ACENTAUR.

  1. Install Tailscale for macOS on both Macs and sign in. The official macOS guide covers the available app variants.
  2. Put both Macs in the same Tailnet. If they belong to different people, the render Mac can be shared through Tailscale.
  3. Confirm that both Macs are online and reachable as described in Connect to devices.
  4. On the render Mac, activate ACENTAUR, install the Models you need, switch on Use this Mac as render server, and leave Port at Automatic.
  5. Open ACENTAUR on the DAW Mac, wait for Host ready, switch on ACENTAUR NET, and allow the Mac on the render side the first time.

Other VPNs are not supported for finding the render Mac. Tailscale connectivity and account membership remain your responsibility.

Network settings and port

Automatic
The render server starts at port 17861 and takes the first free port up to 17870. This is the normal setting.
Custom
Pins one port in the same range, 17861 to 17870. Use it only when a network or firewall rule requires a fixed port.

The DAW Mac finds whichever port the render Mac chose, on the local network and over Tailscale alike.

05 · HOST NOTES

Host notes

ACENTAUR installs as an Audio Unit v2 and as a VST3 plug-in. Which one a host loads is the host’s decision. Logic Pro uses the Audio Unit; most other hosts offer both and let you choose. The two behave the same — the same surface, the same Modes, the same results.

ACENTAUR runs in any host that implements either format to the specification. It is tested and officially supported in Logic Pro 12, Ableton Live 12 and Universal Audio LUNA 2 — those are the hosts we stand behind.

What differs between hosts is not ACENTAUR but what a host is willing to hand over: whether it passes a side-chain signal, whether a clip can be dragged out, and whether it keeps a plug-in running on a track with nothing on it. The notes below say what to expect.

Logic Pro

  • Logic Pro loads ACENTAUR as an Audio Unit.
  • For source-based work, ACENTAUR can receive the track or bus signal directly or through Logic’s Side Chain menu. An assigned Side Chain is always the Capture source; without one, Capture takes the track. Signal below −80 dB does not start a capture, so a noise floor never does.
  • The reliable place for ACENTAUR in Logic is a Software Instrument track, loaded as an AU MIDI-controlled effect. Logic puts effect inserts to sleep on tracks with nothing playing — no Play, no tempo, no playback — but never instrument tracks. Feed the track through the Side Chain menu when you need a Capture. See Generated audio is silent in Logic Pro.
  • An audio region can be dragged to the waveform as INPUT or to the visible reference destination. When used as INPUT, Logic passes the region’s arrangement start to the new Capture.
  • A MIDI region from a Software Instrument track with an active, audible instrument plug-in can be dragged to either destination. Logic renders its sound as audio; ACENTAUR does not receive the MIDI notes.
  • INPUT and REFERENCE remain separate destinations. Start a separate drag from Logic for each one.

Ableton Live

Ableton Live offers ACENTAUR as an Audio Unit and as VST3; both run.

  • An audio clip from Arrangement view can be dragged to the waveform as INPUT or to the visible reference destination.
  • A MIDI clip does not arrive as rendered instrument audio through this drag. Render or record the instrument to audio first, or use the incoming playback signal as INPUT.
  • INPUT and REFERENCE remain separate destinations. Use a separate drag for each one.
  • As an Audio Unit, Live wires a Side Chain to every device. ACENTAUR therefore counts the Side Chain in Live only while it carries signal; otherwise the Capture takes the track itself. In Logic Pro and LUNA an assigned Side Chain is the source as soon as it is assigned.
  • With the VST3 in a project that has not played yet, drop a file only after one Play, or after checking where it landed: Live hands the VST3 its position on the bar grid before the first Play, and ACENTAUR places the file from that. A file that landed in the wrong place does not move by itself — load it again.

Universal Audio LUNA

  • LUNA Timeline clips cannot be dragged out to ACENTAUR.
  • Use audio arriving at ACENTAUR’s main input or side-chain, or load an exported audio file. When LUNA reports that you chose the side-chain, the side-chain is the source — also on a bus or the master.
  • Generation, recall, playback, and dragging the returned WAV into LUNA remain available.

Other hosts and VST3

In a host that offers both formats you may see ACENTAUR twice, once as an Audio Unit and once as VST3. Either is fine. Pick one and stay with it inside a project: a session remembers which plug-in it loaded, and the two do not read each other’s saved state.

  • Generation, playback, recall and dragging the WAV back out work the same in both formats.
  • Whether you can drag a clip into ACENTAUR depends on the host, not on the format. Where a host does not offer it, capture the sound instead or load an exported file.
  • If a host pauses plug-ins on empty tracks, place ACENTAUR where audio actually runs, the way the Logic note describes.

A host that is not listed here is not forbidden — it is untested. If it implements the format properly, ACENTAUR loads, generates and hands the WAV back; individual workflows can be missing where the host does not expose them.

06 · SETTINGS

Installation, Models, storage, and maintenance

The Settings symbol in the plug-in opens Acentaur Settings, an app of its own in your Applications folder. It is where ACENTAUR is set up and looked after: Models, storage, activation, lyrics languages, ACENTAUR Net, maintenance. Nothing here is needed while you make music — once the Models are installed and this Mac is activated, the plug-in has everything it needs.

The app has three pages: Settings, Global History and Audio Analysis. The topics below follow the Settings page from top to bottom, then the other two pages.

The Settings window

The Settings symbol in the plug-in’s utility row opens Acentaur Settings, the app the installer put in your Applications folder. You can also start it from there like any other app, with or without the DAW running. On the first start after installation it opens by itself and walks you through the setup; see Models and storage.

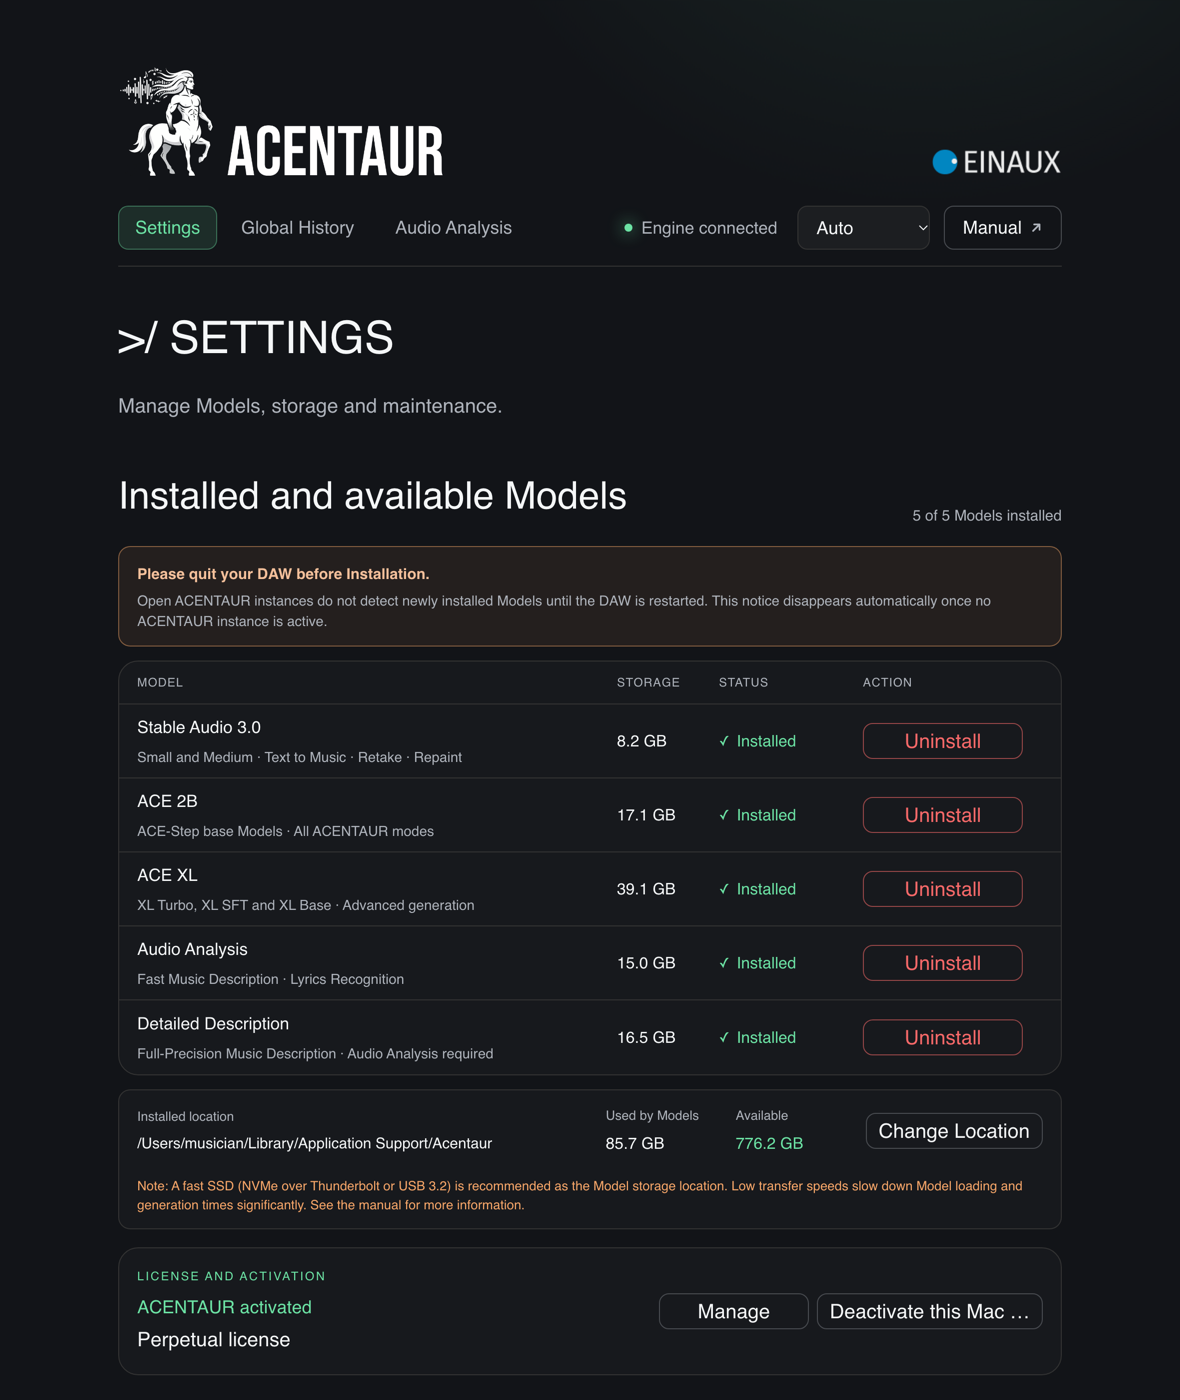
The Settings page with the Model table, the storage location and the license card
The Settings page: Models, storage location and license, in that order.
Settings · Global History · Audio Analysis
The three pages of the app. Settings is where you install and look after ACENTAUR; the other two are described under History, analysis, and preferences.
Engine connected
Green: the engine that does the work on this Mac is running and reachable. Engine unavailable in red means it is not — see The engine is unavailable.
Language
The language of Acentaur Settings only. Auto follows the language of your Mac. It does not change the plug-in, which speaks English.
Manual
Opens this manual in your browser. The Help symbol in the plug-in does the same.

Settings never changes what a plug-in instance is doing. Installing a Model while the DAW is open is fine, but open instances only see the new Model after the DAW has been restarted — the page says so in an orange note while an instance is active.

Models and storage

ACENTAUR itself is small. The Models that make the music are downloaded by Settings, in packages you choose. Each package names what it enables and how much memory and disk it needs, so the decision is yours.

First start: three steps

The installer asks you to agree to the EINAUX End-User License Agreement and lists the licences of the third-party components ACENTAUR includes. When it has finished, Acentaur Settings opens by itself and starts here.

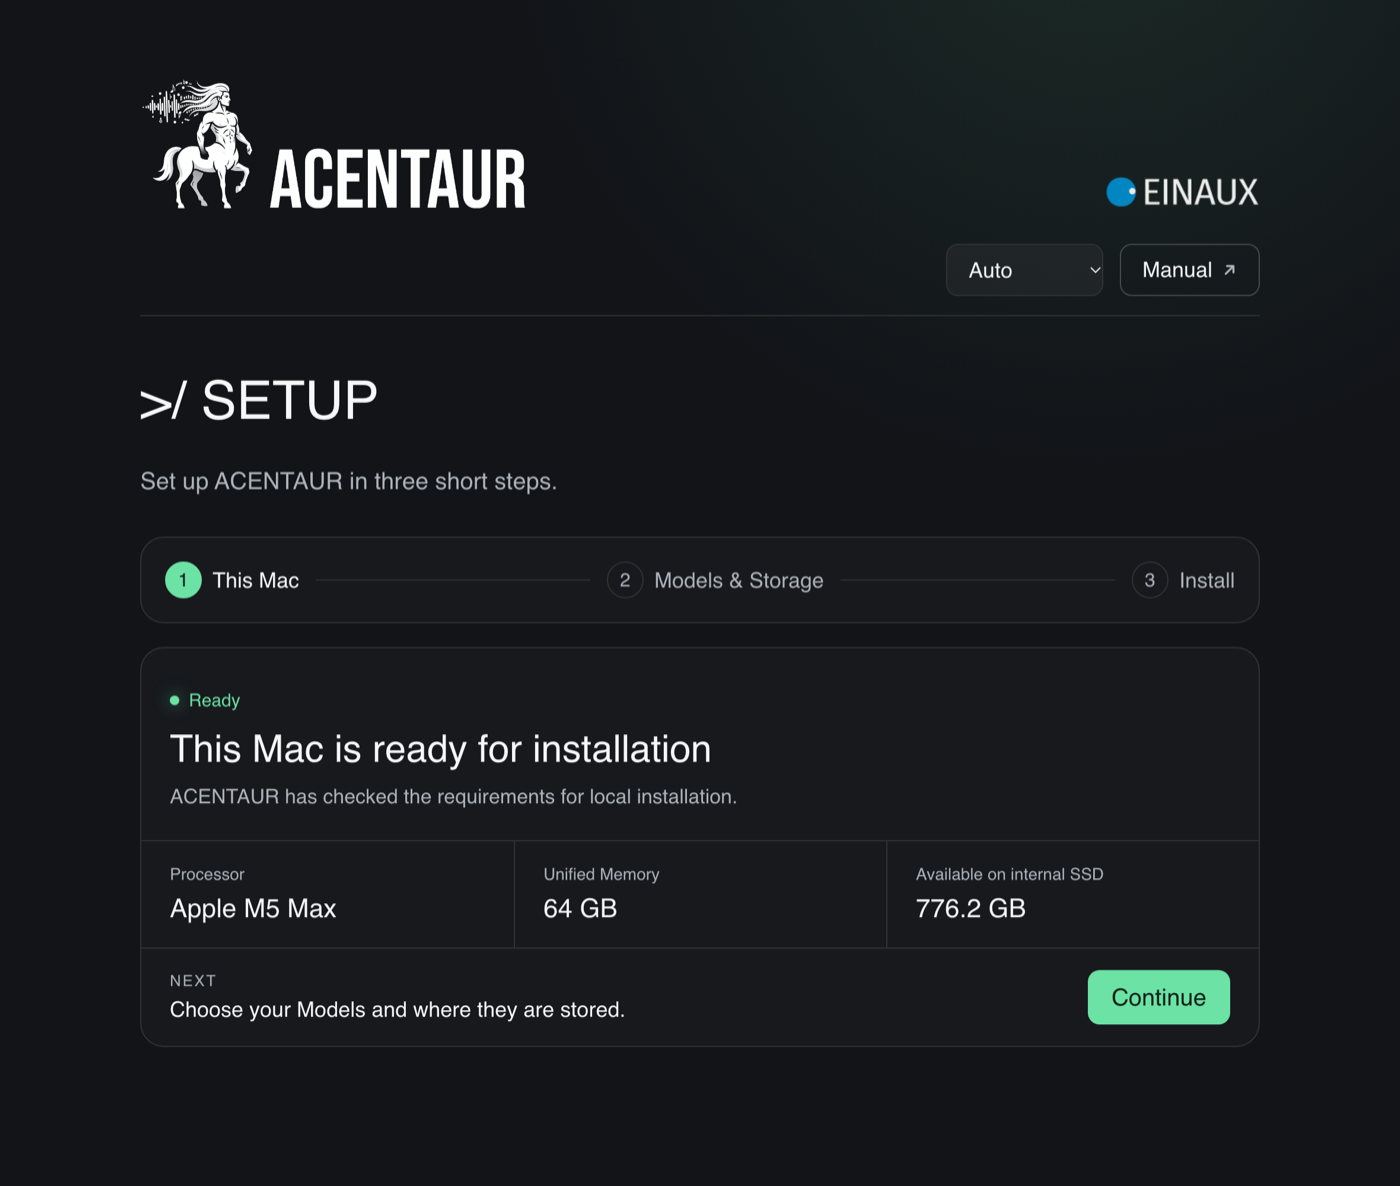
Setup step 1, This Mac: processor, unified memory and free space, with a Continue button
Step 1, This Mac: ACENTAUR checks processor, memory and free space.
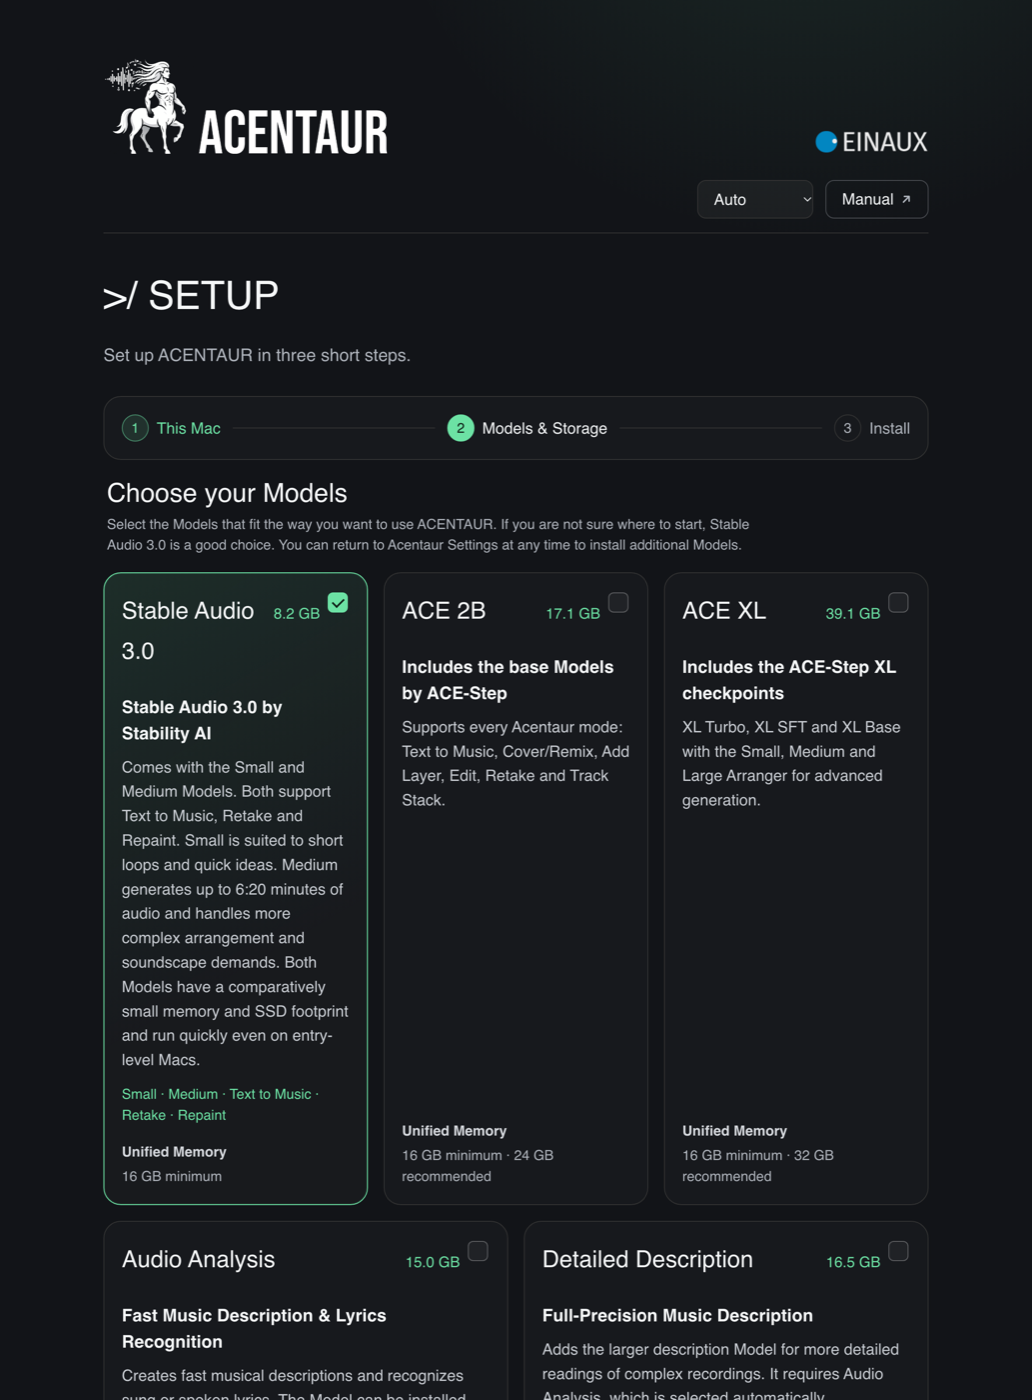
Setup step 2, Models & Storage: the five packages as cards, with size and memory requirement
Step 2, Models & Storage: pick the packages, then where they live.
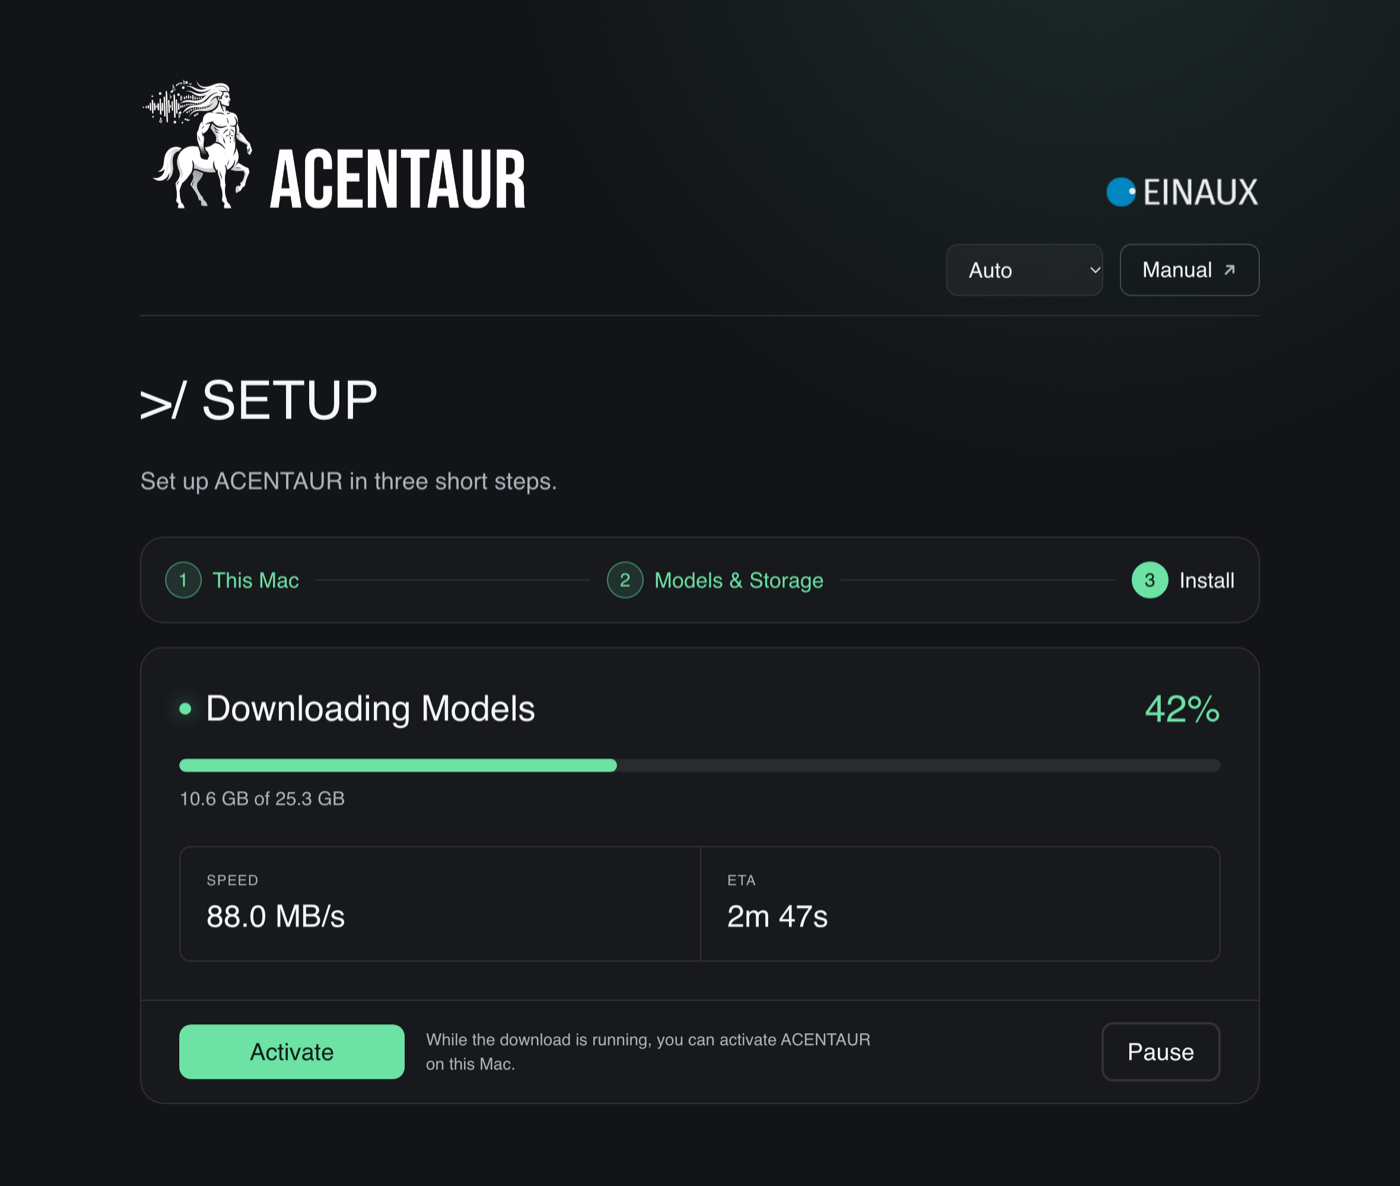
Setup step 3, Install: the download at 42 percent with speed and remaining time, the Activate button and Pause
Step 3, Install: the download runs, activation can happen meanwhile.
This Mac
Shows what this Mac offers. Continue takes you on.
Models & Storage
Tick the packages you want. Below the cards you see the permanent footprint of your selection, the location the Models will be stored in, and the space available there. Choose Another Location… lets you put them on an external drive from the start — read the note on drive speed below first. Nothing is downloaded before you click Install.
Install
Downloads and verifies the packages. You can Pause and Resume, and you can activate ACENTAUR while the download runs — the Activate button sits right there. When everything is in place the page says ACENTAUR is ready and Open Settings takes you to the normal Settings page.
PackageWhat it enablesDiskUnified memory
Stable Audio 3.0Small and Medium · Text to Music, Retake, Repaint. Small memory footprint, quick even on entry-level Macs.8.2 GB16 GB
ACE 2BACE Turbo, SFT and Base with the Small and Medium Arranger · every Mode.17.1 GB16 GB, 24 GB recommended
ACE XLXL Turbo, XL SFT and XL Base with the Small, Medium and Large Arranger · every Mode.39.1 GB16 GB for XL Turbo, 32 GB for all three and the Large Arranger
Audio AnalysisFast Music Description and Lyrics Recognition · the Audio Analysis Mode and Analyze Audio.15.0 GB16 GB
Detailed DescriptionBest Music Description. Requires Audio Analysis, which is selected with it.16.5 GB24 GB

Later, the Settings page lists the same packages as a table with Install, Uninstall and, when files are missing, Repair. Repair downloads only what is missing or damaged; an installation that is still running is not damaged, so Repair does not appear while one runs. Removing a package keeps everything else: the other Models, your Captures and Generations.

Installed location
Where the Models live, with the space they use and the space still available there. The default is on the internal drive.
Change Location
Moves the whole Model library to another drive. ACENTAUR copies first, verifies every file, switches over, and only then removes the old copy. A location that already holds ACENTAUR Models is adopted after verification, without downloading again.
Use default Model location
Brings the library back to the internal drive, the same careful way. Shown only while a custom location is in use.

Keep the Models on a fast drive. Every time a Model is loaded, ACENTAUR reads several gigabytes from that drive, so the drive sets the pace of the first Generate and of every Model change. The internal SSD is the right place. If you need an external drive, make it a fast SSD — NVMe over Thunderbolt or USB 3.2, in the region of 1,000 MB/s or more. On a USB hard disk or a slow stick, every Model load turns into minutes of waiting, and it looks as if ACENTAUR were broken.

If the drive with your Models is unplugged, Settings says Unavailable. Connect the external drive or choose another location. and the plug-in reports Local models are not ready · open Settings. Nothing is replaced behind your back: plug the drive in and everything is there again. Do not rename, merge or move Model folders in the Finder — let ACENTAUR manage the library.

License and activation

ACENTAUR must be activated on every Mac that generates — the Mac with your DAW, and a render Mac for ACENTAUR Net as well. The license card on the Settings page shows where this Mac stands: ACENTAUR activated in green with the kind of license, or ACENTAUR not activated.

The license card: ACENTAUR not activated, with the Activate button
The license card before activation.
Activate
Opens the EINAUX portal in your browser. Sign in with your e-mail address and the code you receive; there is no password. Leave the browser page open until it says the activation is complete — the Settings window then comes forward on its own. ACENTAUR sends no serial number and no raw hardware data.
Manage
Once activated, opens your EINAUX account in the browser, where you see and release your activations.
Deactivate this Mac …
Frees this Mac’s seat without leaving the app: Settings asks once, Deactivate Acentaur on this Mac?, then reports This Mac is deactivated. The seat is free again in your EINAUX account. Use it before you pass a Mac on or move ACENTAUR to a new one. Models, Captures and Generations stay; only generating and analysing wait until an activation.

A purchase covers two Macs, which is what ACENTAUR Net needs. The 21-day trial covers one Mac and starts with its first activation. From time to time ACENTAUR checks in with the portal in the background; the card says so when a check is due or when it has been working offline for a while. Only after a long stretch without contact do new Generations pause — audio you already made stays playable and exportable in every case.

Without activation you can still install Models, open ACENTAUR, capture, play back and browse the Global History. Loading a Model, generating and analysing wait until this Mac is activated; the status line says Activation required · open Settings in red.

History, analysis, and preferences

Two more pages live in the Settings window, and two preferences sit below the license card.

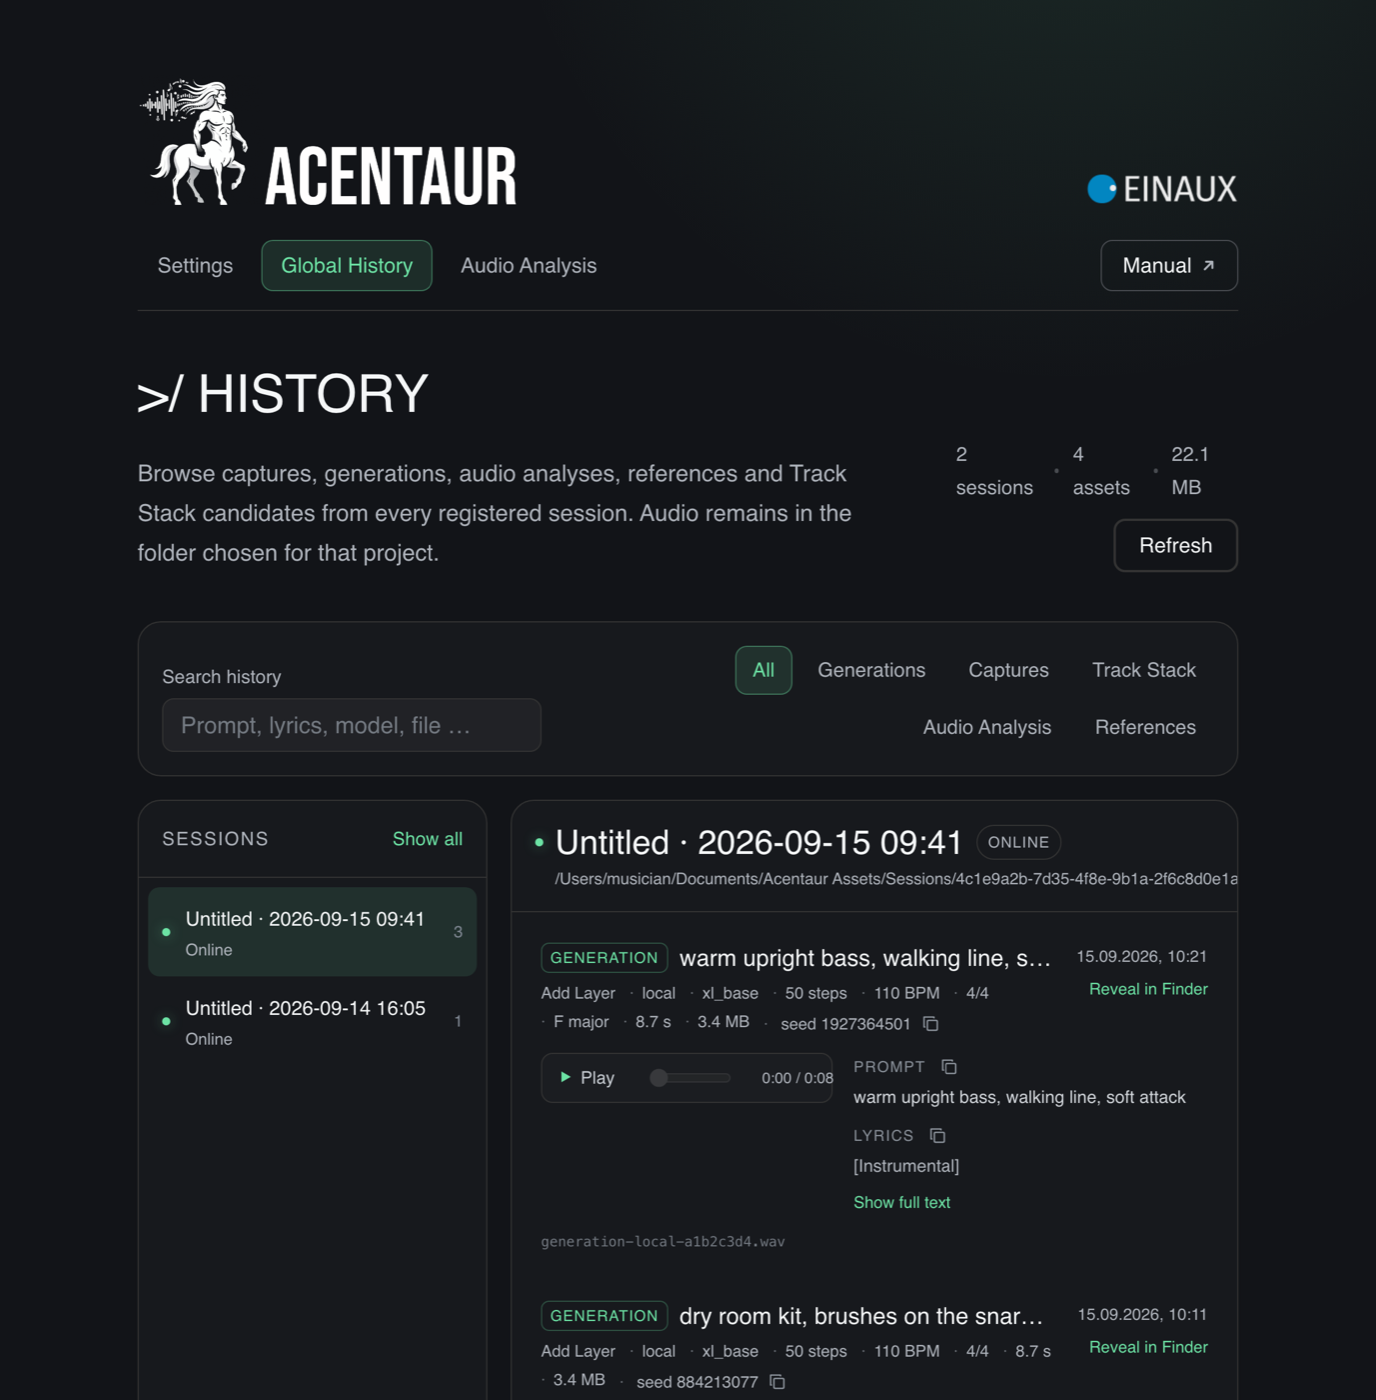
The Global History page with its filters and one card per Generation
Global History: every session, every result, with player, prompt, lyrics and seed.
Global History
Everything ACENTAUR has made or captured, across all sessions and projects. Filter by Generations, Captures, Track Stack, Audio Analysis or References, search by text, sort by date. Each card has a player, the prompt and lyrics with a copy button, the seed with its own copy button, Reveal in Finder and — for Text to Music results — Save as ACENTAUR Preset. A session whose folder is not reachable is listed as unavailable; see An earlier item is not visible in Global History.
Audio Analysis
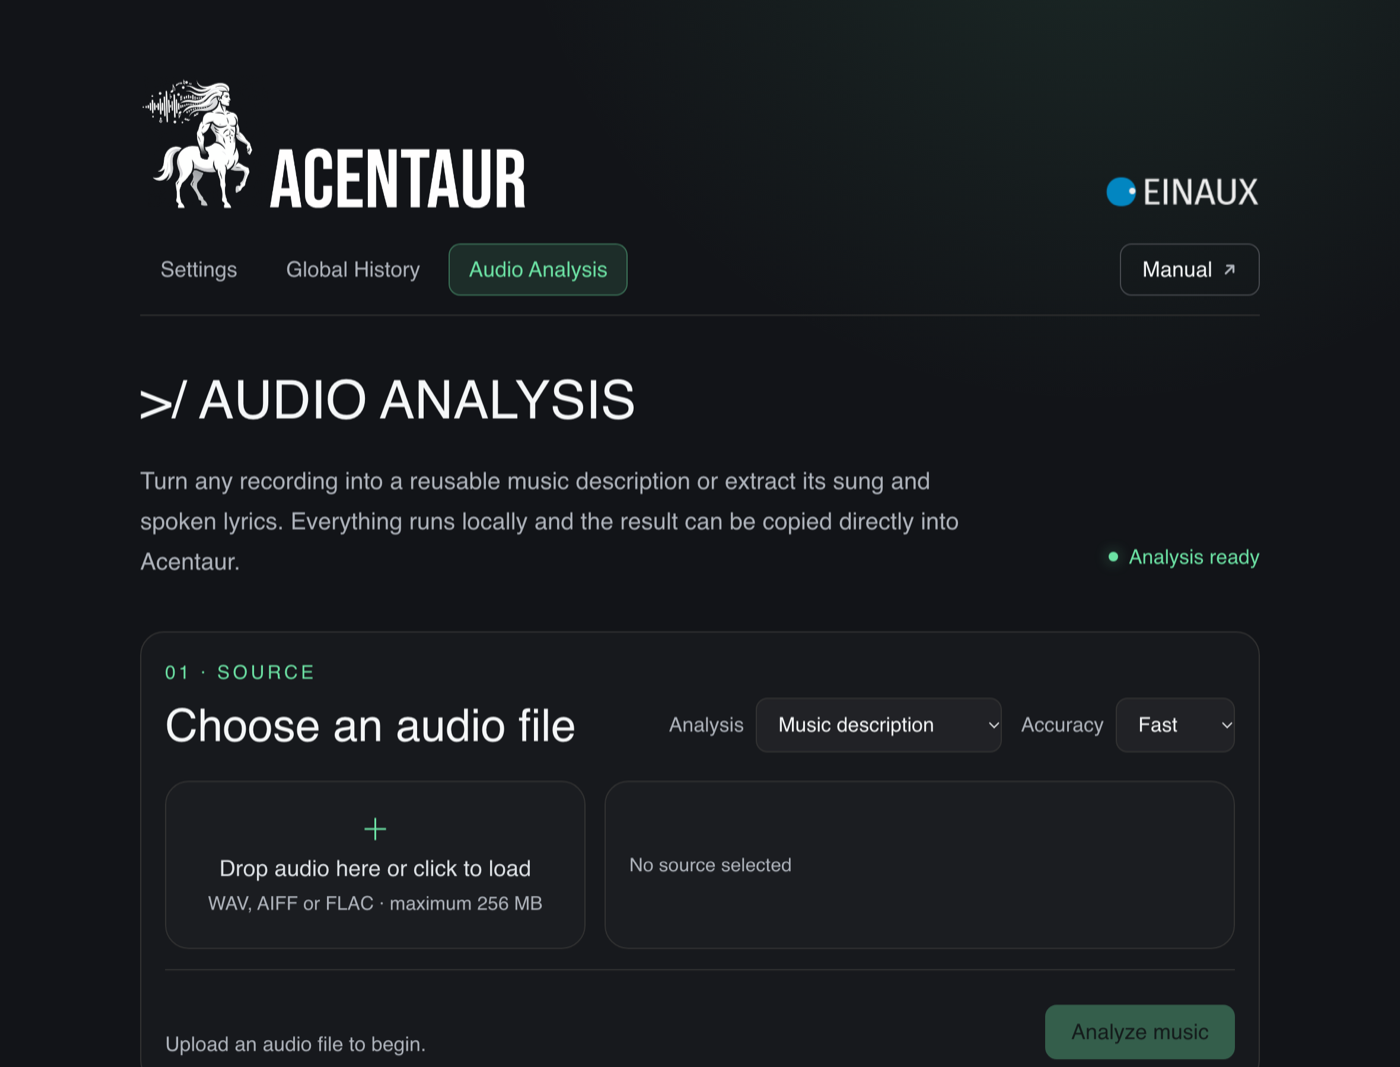
The same analysis as the Mode in the plug-in, for any audio file. Drop or load a WAV, AIFF or FLAC of up to 256 MB, choose Music description or Lyrics transcription and the accuracy Fast or Best, then Analyze audio. Copy result puts the text on the clipboard. Best needs the Detailed Description package.
The Audio Analysis page with the drop zone, the Analysis menu and the Accuracy menu
Audio Analysis in Settings: any file, description or lyrics, Fast or Best.
Lyrics languages
The three languages offered in the plug-in’s Language menu. Choose three different ones and Save. Auto always stays in the menu.
Model memory
Preload Models loads the selected Model as soon as a plug-in window is visible and whenever you switch Mode or Model, so the first Generate does not wait. It costs memory while you are not generating; off by default. Unload all Models frees that memory once any running job has finished — the same as EJECT in the plug-in.

Maintenance and safe recovery

The bottom of the Settings page is for the rare day something needs a repair, and for removing things you no longer want. Read the status line and the Settings page first; most of what looks like a fault is a missing prerequisite that they name.

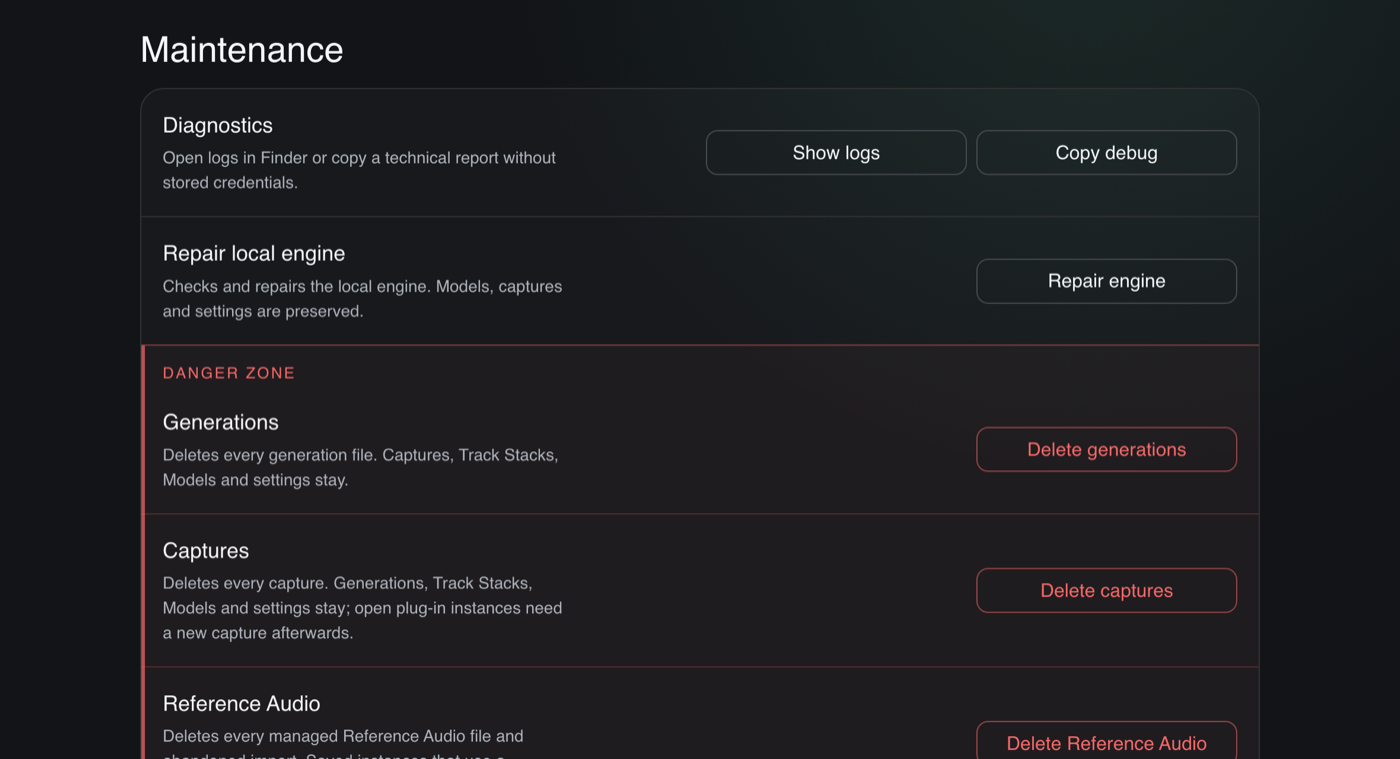
The Maintenance section: Diagnostics and Repair local engine as rows, below them the framed Danger Zone with one row per action
Maintenance: diagnostics and repair above, the Danger Zone below, one row per action with what it removes and what stays.
Show logs
Opens the folder with ACENTAUR’s log files in the Finder.
Copy debug
Puts a technical report on the clipboard, without any stored credentials. Paste it into a message to support before you change anything.
Repair engine
Checks the engine on this Mac and rebuilds only what is missing. Models, Captures and settings are preserved. Settings offers it by itself, with the note The local engine is not fully operational., when a repair is needed.
Danger ZoneWhat it removesWhat stays
Delete generationsAll Generation files.Captures, Track Stacks, Models and settings.
Delete capturesAll Captures.Generations, Track Stacks, Models and settings. Open plug-in instances need a new Capture afterwards.
Delete Reference AudioAll managed Reference Audio and abandoned imports.Everything else. Saved instances that used a reference must load it again.
Uninstall Acentaur …The Audio Unit, the VST3, the engine, all Models, Audio Analysis, caches, logs and settings. macOS asks for your administrator password.Captures, Generations and Track Stack audio, at their storage locations. Your activation, which uninstalling does not release.

The Danger Zone is not troubleshooting. Each row says what its button removes and what stays. Every action asks once and then does exactly what its name says. Keep anything you need before you use it. The same is true for a Model package’s Uninstall further up the page.

07 · TROUBLESHOOTING

Troubleshooting ACENTAUR

When something does not happen, the status line at the foot of the waveform says why. Read it before anything else: grey names what is still missing, orange means ACENTAUR is working, red is an error or a missing prerequisite, green is a finished result. The topics below are sorted by what you see, and each quotes the line as it appears.

Two rules hold throughout. Nothing on the surface is greyed out without the status line saying why. And the Danger Zone in Settings is never the first step — see Maintenance and safe recovery.

Generate is unavailable

GENERATE rests until every prerequisite of the current Mode is met, and the status line always names the first one that is not — a finished result or the confirmation of an import never stands in front of that reason. Fulfil it and the line moves on to the next, or turns green.

Press "Play" in your DAW to transfer host tempo
Grey. Text to Music and an Empty Stack need the tempo and meter of your session, and a host hands them over only while it plays. Press Play once, then Stop. In Logic Pro this needs a track that Logic does not put to sleep; see Generated audio is silent in Logic Pro. Until then the surface counts in 120 BPM and 4/4.
Capture audio
Grey. The Mode works on audio and none is loaded. Press CAPTURE AUDIO and play in your DAW, or drop a file or region onto the waveform. See The intended INPUT is unavailable or silent.
Capture audio, or press Use as Capture
Grey. A Generation is shown, but there is no Capture behind it. Either capture, or press USE AS CAPTURE to work on the Generation you see.
Capture audio (10 s or longer · ≥ 5 bars at 120 BPM)
Grey. Cover / Remix needs at least ten seconds of source. The line works out the bars at your tempo; the shorter capture stays where it is, it is simply not enough.
Repaint needs a 3–90 s target · Repaint needs a 3–90 s selection with 0.25 s of source outside it · Retouch needs a 3–90 s target
Grey. Edit works on a range of that length. Without a selection the whole source is the target; with one, Repaint also needs a little of the source left outside the selection. With a Stable Audio Model: Stable Audio needs at least 0.25 s, or clear the selection to inpaint the whole source.
Describe SOURCE or choose Analyze Audio · SOURCE and TARGET are identical · edit TARGET before Generate
Grey. Flow leads from one described state to another. SOURCE can be written or taken from Analyze Audio; TARGET has to say what should change.
Select a Generation
Grey. Retake needs a template: pick the Generation you want more of in the Playback menu, or step to it with the arrows.
Capture audio, or choose Empty Stack · Create a Track Stack · Select a track
Grey. Track Stack goes in that order: a source, a stack, an armed track. Preparing Track Stack … in orange means the stack is being set up; wait.
Engine busy in another Acentaur instance
Orange. Another instance is generating on this Mac. There is no queue: wait for it, or cancel there.
Local models are not ready · open Settings · Activation required · open Settings
Red. A prerequisite outside the plug-in. See A Model is missing or disabled and License and activation.
Engine offline · open Settings and the other engine lines
Red or orange. See The engine is unavailable.

While ACENTAUR works, GENERATE reads CANCEL and the line shows the phase, Preparing … or Generating … 42 %, in orange. What is running always speaks first: an analysis shows Analyzing audio … even right after a take that ended. A cancelled run ends with Generation cancelled in red — that is the confirmation, not a fault. Batch variants that were already finished are kept.

A take came back silent
Add Layer came back silent. Generate again or change the prompt.
Grey. The Model produced nothing audible. That is its answer, not a fault: there is no second and third attempt behind your back, no red engine error in front of it, and GENERATE reads GENERATE, not RETRY. Generate again, or change the description.
… came back silent. Try another seed or change the prompt.
Grey, when the seed is fixed — typed, from a preset, or held with KEEP SEED. The same seed will give the same silence; change it.
Extract came back silent: bass not recognised. Try a longer selection or a longer Capture.
Grey. The Model did not find the part in what it was given. More material helps most; see Extract.

Generate works, but the first result takes minutes. The first Generate after a Model change loads several gigabytes from the drive that holds the Models; the line names the Model as the menu does, Loading ACE XL Turbo …, in orange meanwhile. On the internal SSD that is seconds. On a slow external drive it is not — see the note on drive speed under Models and storage. PRELOAD moves that wait to the moment you open the window.

Generated audio is silent in Logic Pro

Logic Pro puts an effect plug-in to sleep when nothing plays on its track: no region under the playhead, no live input. A sleeping plug-in is not called at all — it gets no Play, no tempo, and it plays nothing back. On such a track Press "Play" in your DAW to transfer host tempo stays grey however often you press Play. That is how Logic works, not a fault in ACENTAUR, and no other host behaves this way.

ACENTAUR is built as a music effect for exactly this reason: Logic can load it as an AU MIDI-controlled effect on a Software Instrument track, and Logic never puts instrument tracks to sleep. That is the setup to use in Logic.

  • For Text to Music and Empty Stack: put ACENTAUR on a Software Instrument track as a MIDI-controlled effect. Press Play once; the line turns green and stays that way.
  • For Capture on that track: choose the track or bus you want to record in Logic’s Side Chain menu. An assigned Side Chain is always the Capture source; the instrument track itself has no audio of its own.
  • As an Audio FX insert on an Audio track or a bus, ACENTAUR hears that track directly — but only while audio actually flows there. On the master bus, or on any track that is playing, it works at once; on an empty track it sleeps.
  • Playback stays silent although the line is green: the track has to be playing for Logic to run the plug-in. Use the instrument-track setup, or put a region under the playhead. Check Mix and Return at the bottom of the panel as well.

What you hear from ACENTAUR is only ever inside this plug-in instance. To keep a result, drag it from the waveform’s drag field into your arrangement; see Logic Pro.

The intended INPUT is unavailable or silent

A Capture starts only when two things are true at once: your DAW is playing, and audio above −80 dB reaches ACENTAUR. It ends when the DAW stops. The status line tells you which half is missing.

Armed · press Play in your DAW
Orange. ACENTAUR is waiting. Press Play in the DAW. If it stays armed while the DAW runs, no signal is arriving: check that the track carries audio at that position, that it is not muted, and that the plug-in sits where the audio flows. In Logic Pro, use the instrument-track setup and choose the source in the Side Chain menu; see Generated audio is silent in Logic Pro.
Capturing 4.00 s · 0 dropped frames
Orange. Recording. It stops with your DAW; with Cycle on, the capture is trimmed to the locators.
It captures the wrong signal
An assigned Side Chain is the source whenever your host reports it as chosen, on tracks, buses and the master alike, even if it is still silent. Remove the assignment to record the track itself. A Side Chain that is offered but not assigned does not count. Ableton Live is the exception: it wires a Side Chain to every Audio Unit, so there the Side Chain counts only while it carries signal.
Receiving audio from your DAW …
Green. You dropped a region and the DAW is still rendering it. Wait; the waveform fills by itself. If nothing arrives, the line says The audio from your DAW has not arrived · drop it again after three minutes.
Press Play in your DAW once to transfer the tempo, then drop the file again
Grey. A dropped file is placed on the bar grid, and the grid needs the host tempo first.
The audio landed in the wrong place
The pill under the pointer says Drop as Capture or Drop as Reference before you let go. INPUT and REFERENCE are separate destinations; a reference never becomes the INPUT. Start a second drag for the other one.

While a capture, a generation or an analysis runs, the drop zones are dimmed and take nothing new. What a host is willing to hand over — a clip, a MIDI region, a side-chain — differs; see Host notes.

A Model is missing or disabled

The Model menu offers only what the current Mode can use. A Model that is not in the menu is not disabled; it is not part of this Mode. Add Layer, Extract, Track Stack and Session Player run on ACE Base and ACE XL Base only; Flow and Retouch on the ACE Models; Stable Audio in Text to Music, Retake and Repaint with a selection.

Local models are not ready · open Settings
Red. The package for the selected Model is not installed, incomplete, or on a drive that is not connected. Open Settings: the Model table shows Install or Repair, and the storage row says Unavailable when the drive is missing. See Models and storage.
This preset needs ACE XL · install it in Settings.
Grey, after loading a preset. The preset asks for a Model from a package this Mac does not have. The preset is loaded anyway; install the package it names — ACE 2B, ACE XL or Stable Audio — or pick another Model.
Model not available on the render Mac · choose another
Red, with ACENTAUR Net on. The render Mac decides what is available; install the Model there or choose one it has.
An Arranger size is greyed out
Its weights are not installed. The Large Arranger comes with ACE XL; a project that asked for a size this Mac lacks falls back to the next smaller one.
Install Audio Analysis in Settings
Red, in Audio Analysis. The analysis package is separate from the music Models. Detailed needs Detailed Description as well.

After installing a Model while the DAW was open, restart the DAW. Open instances do not see the new Model before that; Settings says so while an instance is active.

The engine is unavailable

The engine is the part of ACENTAUR that runs the Models on this Mac. The plug-in starts it when needed and stops it a while after the last instance closes. You never start it yourself; when it is not there, the status line says so in red or orange.

Checking engine …
Orange. The plug-in is looking for the engine or waiting for it to start. Give it a moment; after a fresh install or a reboot this can take a few seconds.
Engine offline · open Settings · Engine status unavailable · open Settings · Engine error · open Settings
Red. The engine did not start or stopped answering. Open Settings. If its header says Engine connected, close and reopen the plug-in window. If it says Engine unavailable, or shows The local engine is not fully operational., use Repair engine; Models, Captures and settings are preserved. See Maintenance and safe recovery.
Engine update required · reinstall Acentaur
Red. Plug-in and engine are from different versions, usually after an installation that did not finish. Run the installer again; it replaces every part.
Installation damaged · reinstall Acentaur
Red. The engine failed its own integrity check. Repair cannot fix this; run the installer again.
Settings says This window belongs to an earlier session.
The engine has been restarted since the window opened. Close it and open Acentaur Settings again.

Before you repair or reinstall, use Copy debug in Settings and keep the report; it is what support will ask for. Reinstalling never removes Models, Captures or Generations.

ACENTAUR Net offline

  • ACENTAUR NET does not appear: no render Mac was found. On the render Mac, confirm the activation, the Models and Use this Mac as render server. For the local network, both Macs must be in the same reachable network; over Tailscale, both must be online and see each other before you reopen ACENTAUR.
  • It stays at Connecting to the render Mac · confirm there …: the confirmation is waiting on the render Mac. Someone has to allow it there; after two minutes it counts as refused.
  • Could not connect to the render Mac: the request was refused, timed out, or another DAW Mac is already connected. Only one Mac can render there at a time.
  • Model not available on the render Mac · choose another: the chosen Model is installed locally but not on the render Mac. Pick another Model, or install it there.
  • Settings on the render Mac says Activate ACENTAUR on this Mac to use it as a render server.: the render Mac needs its own activation; without one it does not listen at all.
  • Leave Port at Automatic unless your network requires a fixed port.

An earlier item is not visible in Global History

Global History lists what it finds in the session folders on disk. An item that is missing is usually filtered out, or its folder is not reachable at the moment.

  • Clear the search field, choose All and Show all, and check the sort order. Refresh reads the folders again.
  • A session marked as offline lives in a folder Global History cannot open right now — on a drive that is not connected, or in a Save Location that was moved or renamed. Connect the drive or put the folder back; the entries return without any further step.
  • If a project was saved with its own Save Location, open the project in the DAW and look at the ACENTAUR instance there: its Playback menu lists the Captures and Generations of that instance.
  • Track Stack takes live inside the stack’s folder and appear under the Track Stack filter, not under Generations.

What the Danger Zone deleted is gone: Delete generations, Delete captures and Delete Reference Audio remove the files themselves. Global History cannot bring them back.